Motherboard
Is the main circuit board of a computer. It is the central component that connects all the other hardware components together, allowing them to communicate and work together. In this article, we will explore everything you need to know about motherboards, including their relationship with the case, different types and brands, their functions, modern expansion slots and ports, how to choose the right motherboard, installation, updating, and troubleshooting.
When it comes to building or upgrading a computer, the motherboard is a crucial consideration. It serves as the foundation on which all other components are built upon. The motherboard not only provides physical support for these components but also acts as the central hub that facilitates communication between them. Without a properly functioning motherboard, a computer simply cannot operate.
In conclusion, the motherboard is the central component of a computer, connecting all other hardware components together. Understanding its relationship with the case, different types and brands, functions, modern expansion slots and ports, how to choose the right motherboard, installation, updating, and troubleshooting is essential for anyone looking to build or upgrade a computer. With the right motherboard, users can ensure optimal performance and compatibility for their systems.
Case Importance
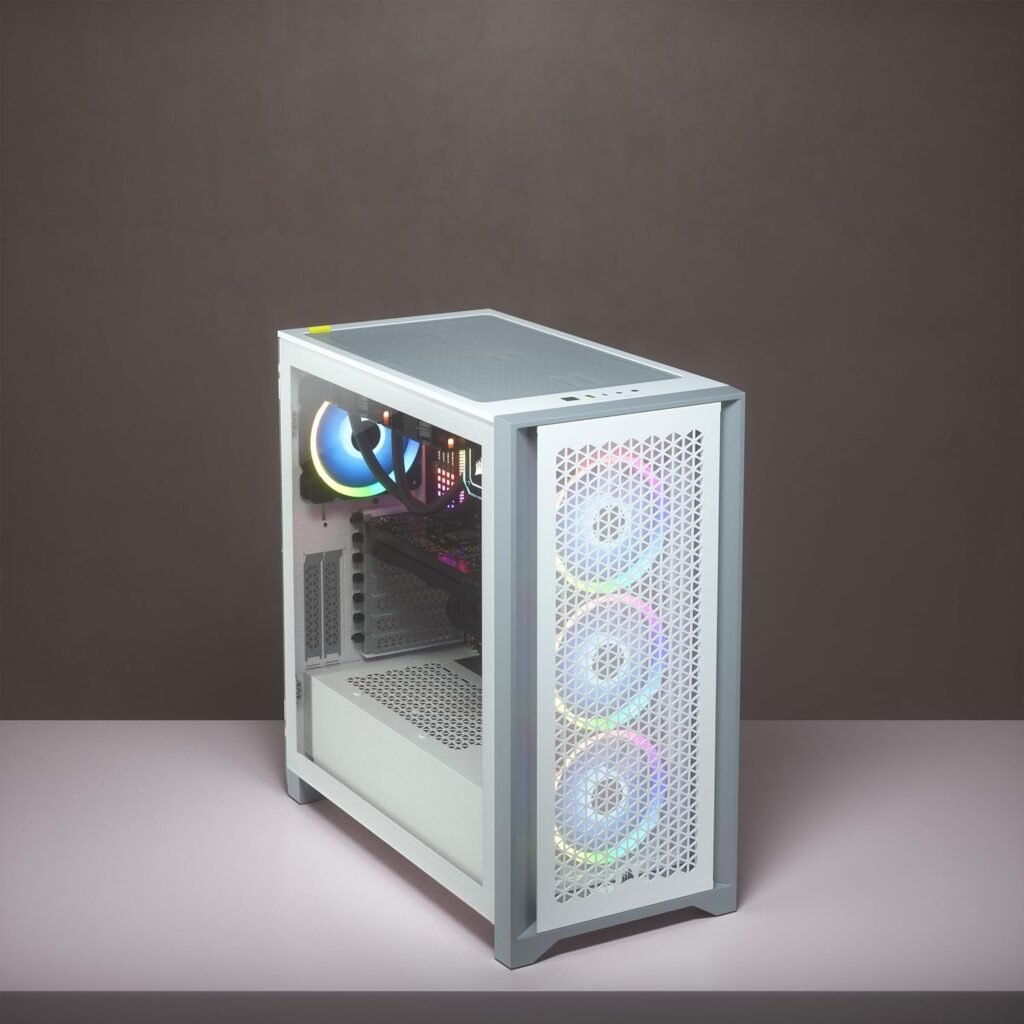
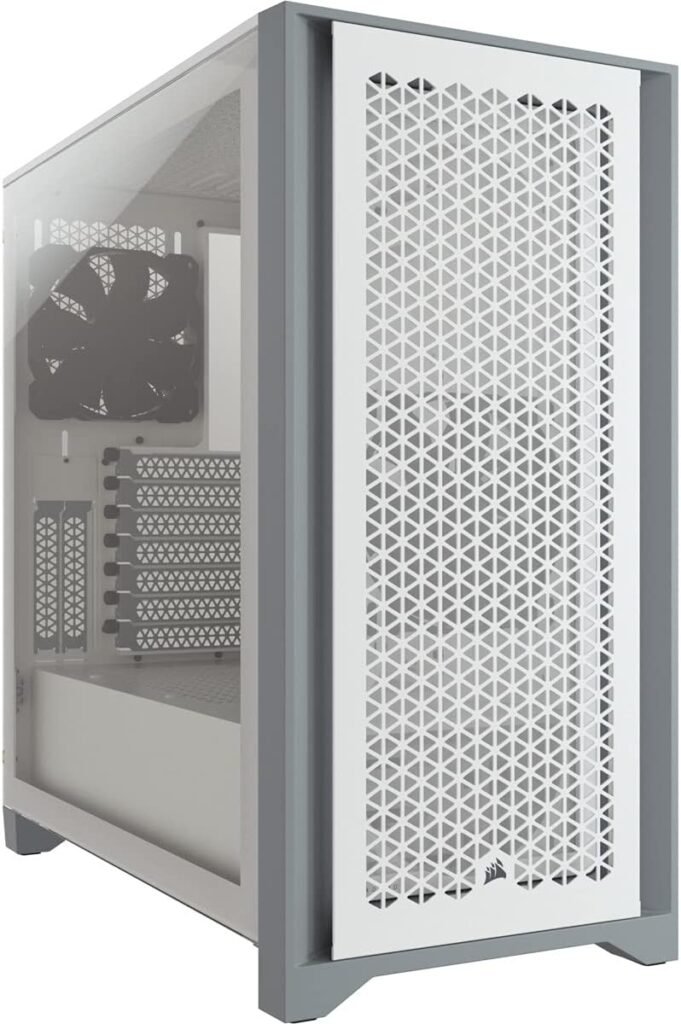
The motherboard is typically housed inside the computer case. It is secured to the case using screws or standoffs to ensure stability and proper alignment. The case provides physical protection to the delicate components on the motherboard and helps in proper heat dissipation.
When choosing a motherboard, it is important to ensure that it is compatible with the case you have or plan to use. Motherboards come in different form factors, such as ATX, Micro ATX, and Mini ITX, which determine their size and shape. The case should have corresponding mounting points and sufficient space to accommodate the chosen motherboard.
Furthermore, the case contributes to the cooling and ventilation of the motherboard. It is designed with various openings and vents that allow for the efficient flow of air, preventing overheating and maintaining optimal operating temperatures. This is particularly important as modern motherboards often come with powerful processors and other components that generate a significant amount of heat. Moreover, the case also helps in organizing and managing the cables connected to the motherboard.
Additionally, the case may offer additional features and functionalities that complement the motherboard. This can include front panel connectors, such as USB ports, audio jacks, and power buttons, which are directly connected to the motherboard for easy access. Some cases also come with built-in fans or liquid cooling support, further enhancing the cooling capabilities of the system.
Motherboard Types
As we mentioned before there are various types and brands of motherboards available in the market. The type and brand of motherboard you choose depends on the specific requirements of your computer build and your preferences. Some common types of motherboards include:
- ATX: This is the most common form factor and offers a wide range of features and expansion slots. It is designed to fit into standard ATX cases and provides enough room for multiple graphics cards, RAM modules, and other peripherals. ATX motherboards are generally considered the go-to choice for gaming and high-performance systems.
- Micro ATX: Smaller than ATX, it is suitable for compact builds with fewer expansion needs. Micro ATX motherboards are compatible with Micro ATX cases and offer a good balance between size and functionality. They may have fewer expansion slots and RAM slots compared to ATX motherboards, but they still provide enough room for most standard components.
- Mini ITX: The smallest form factor, ideal for small form factor or HTPC (Home Theater PC) builds. Mini ITX motherboards are incredibly compact and designed to fit into Mini ITX cases. While they have limited expansion options due to their small size, they are perfect for building small, portable systems or home theater PCs.
Motherboard Brands
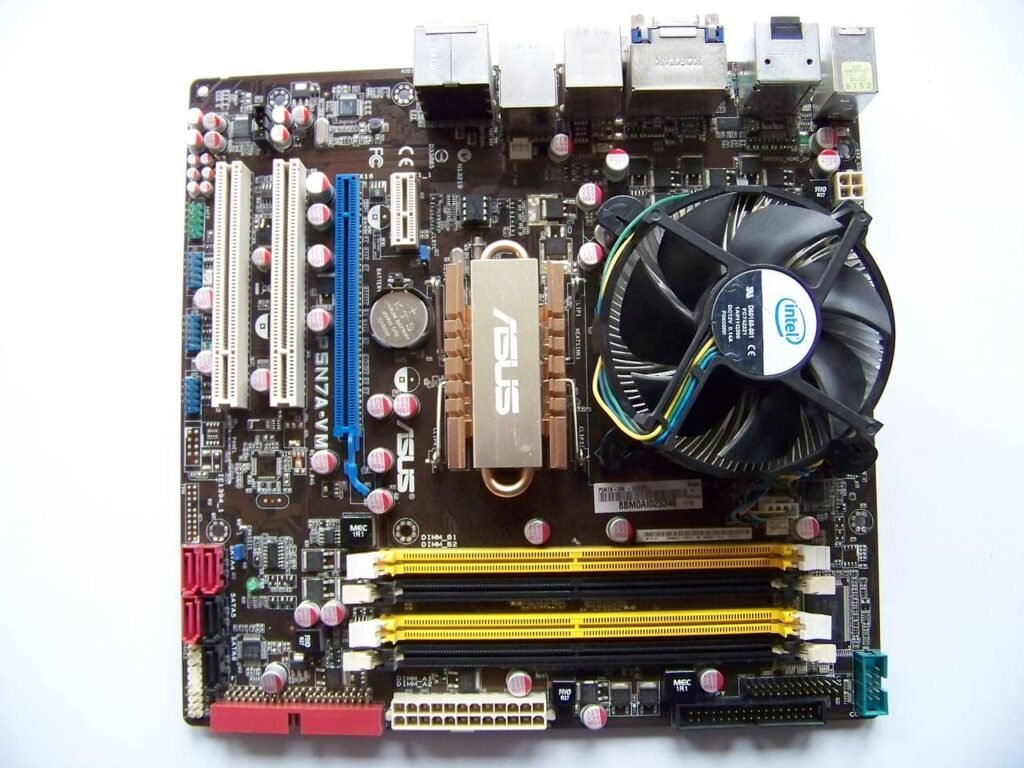
When it comes to brands, there are several reputable manufacturers to choose from, including ASUS, Gigabyte, MSI, ASRock, and more. Each brand offers a range of models with different features, performance levels, and price points. ASUS, for example, is known for its high-quality motherboards with robust power delivery systems, extensive BIOS options, and excellent overclocking capabilities.
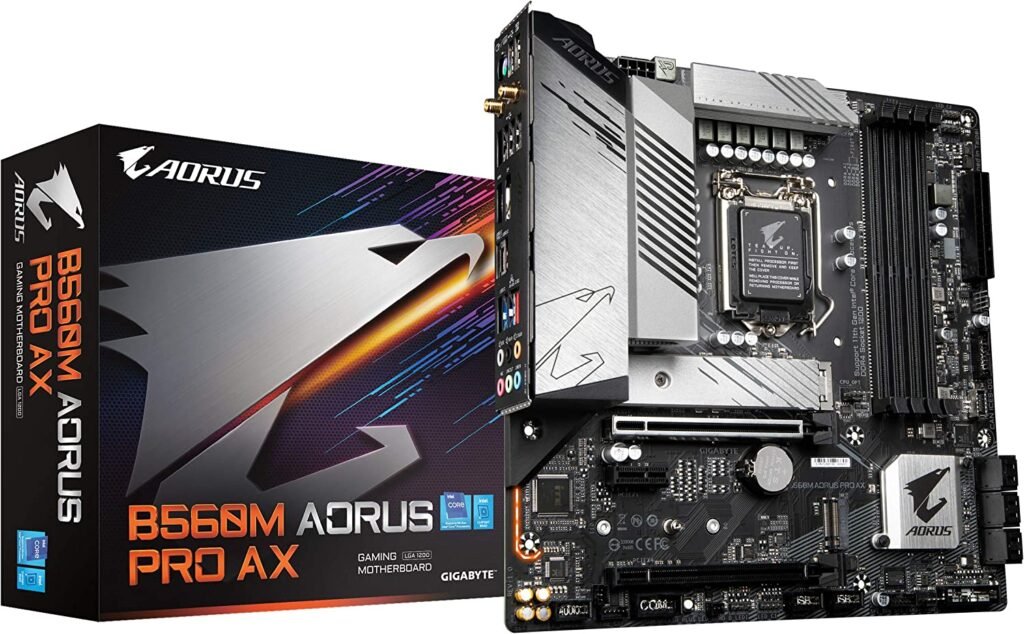
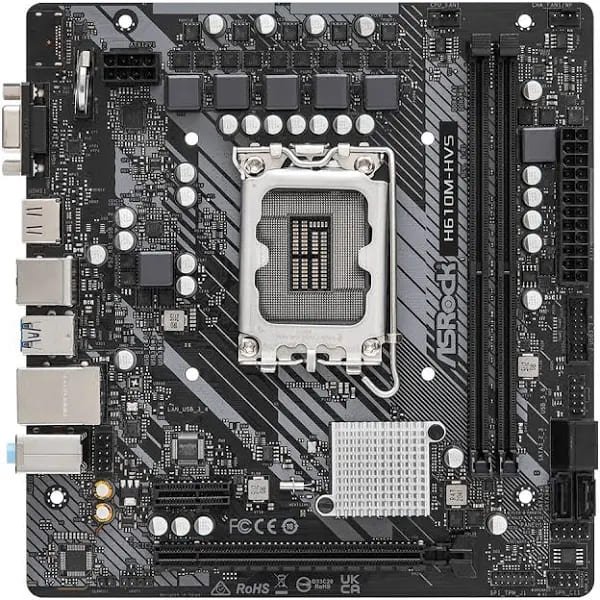
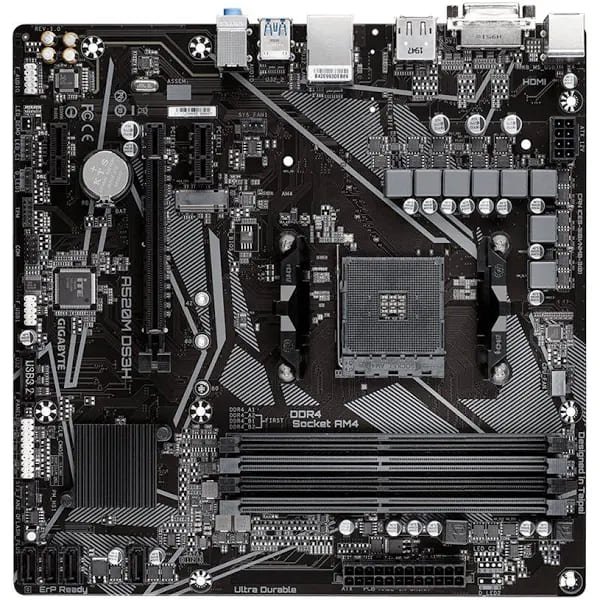
Gigabyte, on the other hand, focuses on providing motherboards with reliable performance and durability, often at a more affordable price point. MSI is renowned for its gaming-oriented motherboards, offering features like enhanced audio, RGB lighting, and reinforced PCIe slots for graphics cards. ASRock, while not as widely recognized as the others, offers budget-friendly options without compromising on quality and performance.
It is advisable to research and read reviews to find a reliable brand that meets your specific requirements. Consider factors such as compatibility with your CPU and other components, available expansion slots, overclocking potential, and overall build quality. Reading user reviews and professional benchmarks can provide valuable insights into the performance and reliability of different motherboard models. Additionally, it is important to consider the warranty and customer support offered by the manufacturer, as this can greatly influence your overall experience with the motherboard.
Motherboard Functions
Functionally, the motherboard is responsible for connecting and powering all the other components of the computer. It houses the CPU socket, where the processor is installed, as well as the memory slots, where RAM modules are inserted. Additionally, it provides slots for expansion cards, such as graphics cards and sound cards, allowing users to enhance the capabilities of their systems. A motherboard performs several crucial functions that are essential for the proper functioning of a computer. Some of the key functions of a motherboard include:
Power Distribution
The motherboard distributes power to all the components connected to it, ensuring they receive the appropriate voltage and current.
Processor Socket
The motherboard provides a socket for the CPU (Central Processing Unit) to be installed. It facilitates communication between the CPU and other components.
Memory Slots
The motherboard has slots for installing RAM (Random Access Memory) modules. It allows the CPU to access data quickly and efficiently.
Expansion Slots
These slots allow for the installation of expansion cards, such as graphics cards, sound cards, and network cards, to enhance the computer’s capabilities.
Storage Connectors
The motherboard provides connectors for connecting storage devices, such as Hard Drives and SSDs (Solid State Drives).
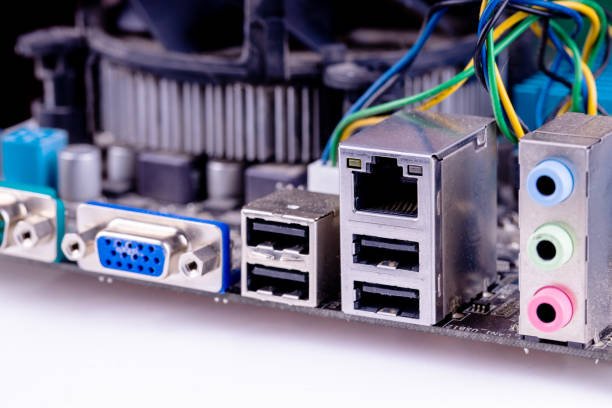
Input/Output Ports
Motherboards have various ports for connecting peripherals, including USB ports, audio jacks, Ethernet ports, and video ports.
BIOS
The Basic Input/Output System (BIOS) is stored on the motherboard and provides the firmware necessary for the computer to boot up and initialize the hardware.
CMOS Battery
The motherboard also contains a small battery called the CMOS battery, which powers the CMOS (Complementary Metal-Oxide-Semiconductor) memory. This memory stores the computer’s BIOS settings, such as the date and time, even when the computer is powered off.
Chipset
The motherboard’s chipset acts as the communication hub between the CPU, memory, and other components. It manages data flow and ensures compatibility between different hardware components.
Bus System
The motherboard features a bus system that allows data to be transferred between different components. The bus speed determines how quickly data can be transmitted.
Overclocking Support
Some motherboards offer overclocking support, allowing users to increase the clock speed of their CPU and RAM for improved performance. However, this should be done with caution, as it can lead to instability and overheating if not done properly.
Form Factor
Motherboards come in different form factors, such as ATX, micro ATX, and Mini-ITX. The form factor determines the physical size and layout of the motherboard, which affects the compatibility with computer cases and the number of expansion slots available.
Motherboard Expansion Slots and Ports
In recent years, modern motherboards have evolved to include a wide range of expansion slots and ports to accommodate the growing needs of users. These include PCIe slots for high-speed graphics cards and NVMe storage devices, USB ports for connecting peripherals, SATA ports for connecting hard drives and SSDs, and audio jacks for connecting speakers and headphones. The availability and configuration of these slots and ports vary depending on the motherboard model.
Modern motherboards offer a range of expansion slots and ports to cater to different needs. Some of the commonly found expansion slots and ports include:
PCIe (Peripheral Component Interconnect Express) Slots
These high-speed slots are used for installing graphics cards, sound cards, network cards, and other expansion cards. PCIe slots have evolved over time, with the latest version, PCIe 4.0, offering even faster data transfer speeds and increased bandwidth. This allows for smoother gaming experiences, faster file transfers, and improved overall system performance.
M.2 Slots
M.2 slots are used for connecting high-speed storage devices, such as SSDs, directly to the motherboard. They offer faster data transfer speeds compared to traditional SATA connections. M.2 slots come in different lengths and support various interfaces, including PCIe and SATA. The latest M.2 drives, utilizing PCIe 4.0, can achieve astonishing read and write speeds, making them ideal for demanding tasks like video editing and gaming.
USB Ports
USB ports are used for connecting various peripherals, such as keyboards, mice, printers, and external storage devices. USB technology has evolved over the years, with the latest version, USB 3.2 Gen 2×2, offering blazing-fast transfer speeds of up to 20 Gbps. This makes it possible to transfer large files in seconds and charge devices quickly.
Audio Ports
These ports allow for the connection of speakers, headphones, and microphones. The latest motherboards often feature high-definition audio ports that support surround sound and provide crystal-clear audio output. Some motherboards also include dedicated audio processors or DACs (Digital-to-Analog Converters) for audiophiles who demand the highest audio quality.
Ethernet Port
The Ethernet port enables a wired network connection for internet access. With the increasing demand for faster internet speeds, modern motherboards often come equipped with Gigabit Ethernet ports, which offer speeds up to 1 Gbps. Some high-end motherboards even feature 2.5 Gbps or 10 Gbps Ethernet ports, providing lightning-fast network connectivity for gamers and content creators.
HDMI/DisplayPort
These ports are used to connect monitors or displays for video output. HDMI and DisplayPort are the most common video interfaces found on modern motherboards. They support high-resolution displays, including 4K and even 8K, and offer features like HDR (High Dynamic Range) for vibrant colors and smooth video playback.
These expansion slots and ports are just a glimpse of the wide range of connectivity options available on modern motherboards. Whether you’re a gamer, a content creator, or a casual user, having a motherboard with the right expansion slots and ports can greatly enhance your computing experience.
Motherboard Choosing the Right One
Choosing the right motherboard involves considering factors such as the intended use of the computer, the desired performance level, and the compatibility with other components. All motherboards come with a technical manual, better known as the motherboard book. You must have this book ! It is your primary source for all of the critical information about the motherboard. If you have a motherboard with no manual, you can usually find a copy of the manual online at the manufacturer’s Web site.
It is essential to ensure that the motherboard supports the desired CPU socket type, has enough memory slots for future upgrades, and offers the necessary expansion slots and ports required for the user’s needs.
Choosing the right motherboard is crucial as it determines the compatibility and performance of your computer build.
Here are some factors to consider when selecting a motherboard:
Form Factor
Choose a motherboard that is compatible with the case you have or plan to use.
CPU Socket
Ensure that the motherboard supports the socket type of your chosen CPU.
RAM Support
Check the maximum supported RAM capacity and speed of the motherboard.
Expansion Slots
Consider the number and type of expansion slots required for your specific needs.
Connectivity
Ensure that the motherboard has the necessary ports and connectors for your peripherals.
Brand and Reliability
Research and choose a reputable brand known for quality and reliability.
Overclocking Capabilities
If you are interested in overclocking your CPU or RAM, look for a motherboard that has robust power delivery and cooling options.
BIOS Features
Consider the features available in the motherboard’s BIOS, such as easy overclocking settings, fan control, and advanced tweaking options.
Future Upgradability
Think about your future needs and whether the motherboard supports technologies like PCIe 4.0 or USB 3.1 Gen 2 for potential future upgrades.
Price
Set a budget and find a motherboard that offers the best value for your money, considering all the features and specifications you require.
By carefully considering these factors, you can ensure that you choose a motherboard that meets your specific requirements and allows for a smooth and efficient computer build. It is also advisable to read reviews and consider the feedback of other users to make an informed decision.
Motherboard Installation
Installing and assembling a motherboard is a crucial step in building a computer or upgrading an existing system . It involves fixing the motherboard to the case, installing the RAM and CPU, making electrical connections, and connecting various peripherals. In this guide, we will walk you through the detailed process of installing and assembling a motherboard, ensuring that you follow the manufacturer’s instructions and take necessary precautions to avoid any damage to the components.
Preparation
Before you begin the installation process, it is essential to gather all the necessary tools and components. Make sure you have the following items ready:
CPU: Ensure that you have a compatible CPU for your motherboard.
RAM: Select the appropriate RAM modules for your motherboard.
Motherboard: Ensure that the motherboard you have is compatible with your computer case and other components.
Screwdriver: You will need a screwdriver to secure the motherboard to the computer case.
Power supply: Make sure you have a compatible power supply unit (PSU) that can provide sufficient power to all the components.
Storage devices: If you are installing new storage devices, such as hard drives or solid-state drives, have them ready.
Peripherals: Gather any additional peripherals, such as graphics cards, sound cards, or network cards, that you plan to install.
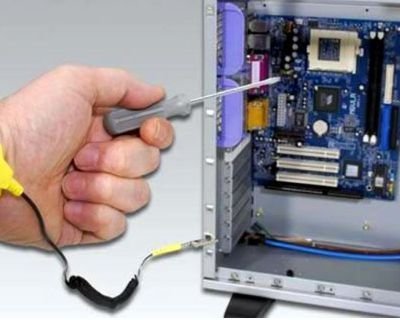
Antistatic wrist strap: To prevent any static electricity from damaging the sensitive components, use an antistatic wrist strap.
Step-by-Step Installation
Follow these steps to install the motherboard correctly:
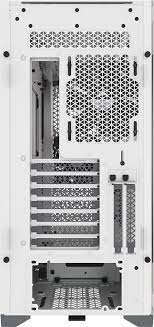
1. Prepare the Computer Case
Open the computer case by removing the side panel. Refer to the case manual if needed. Ensure that the case is placed on a stable surface.


2. Ground yourself
Before handling any components, wear an antistatic wrist strap and connect it to a grounded object to discharge any static electricity.
3. Locate the Motherboard Mounting Holes
Identify the mounting holes on the computer case that align with the screw holes on the motherboard. These holes may vary depending on the form factor of your motherboard.
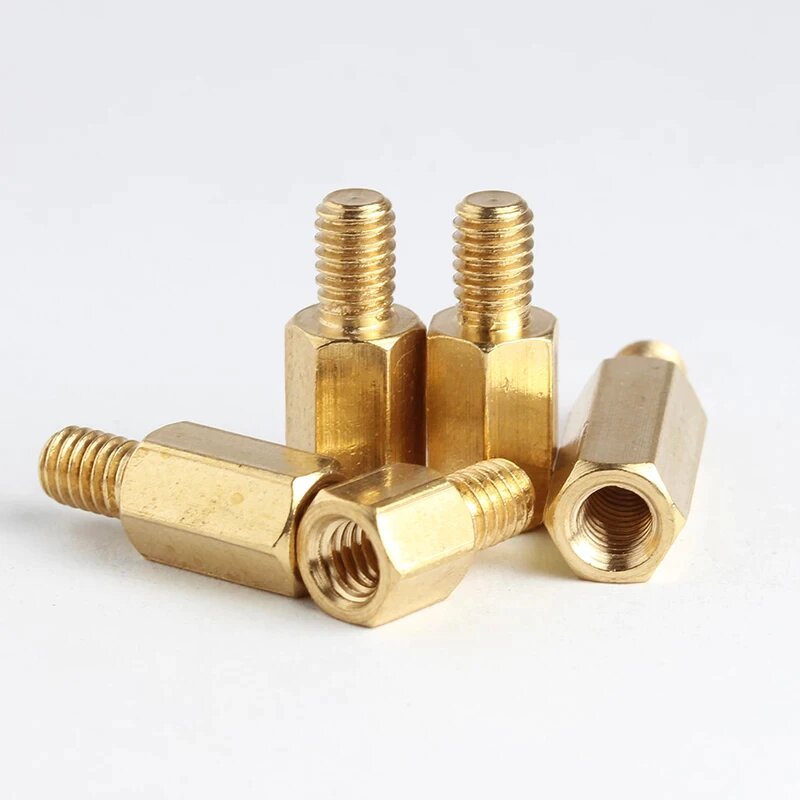
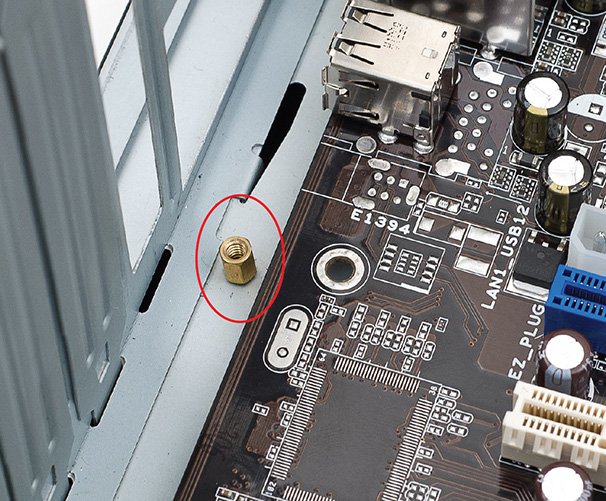
4. Locate the standoffs
Locate the standoffs (provided with the case), which fit into the corresponding mounting holes on the computer case. These standoffs will elevate the motherboard and prevent it from touching the case directly. This helps avoid short circuits caused by metal parts of the Case coming into contact with the motherboard. Do not screw the Motherboard to the Case yet.
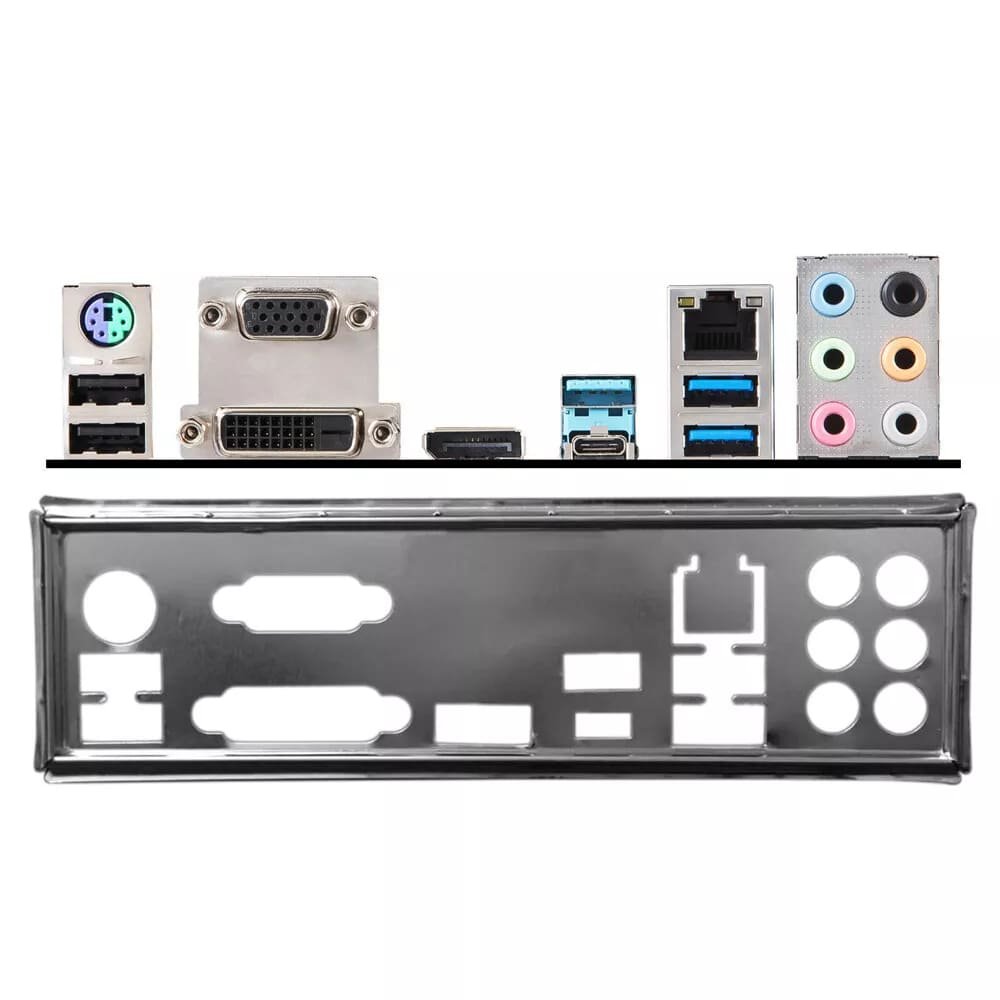
5. Install the I/O Shield
The I/O shield, also known as the backplate, is a metal plate that covers the motherboard’s rear ports. Insert it into the rectangular opening on the back of the computer case, aligning it with the motherboard’s I/O ports.

6. Install the CPU
Refer to the motherboard manual for instructions on installing the CPU (Central Processing Unit). Ensure that the CPU is compatible with the motherboard socket. Gently place the CPU into the socket, aligning the notches or markers, and secure it using the CPU retention mechanism.
7. Install the CPU Cooler
Apply a small amount of thermal paste on the CPU, then attach the CPU heat sink or any other cooler according to the manufacturer’s instructions. Make sure it is firmly attached and properly connected to the CPU fan header on the motherboard.
8. Install the RAM
Refer to the motherboard manual to identify the RAM slots. Insert the RAM modules into the slots, aligning the notches on the module with the slot. Apply gentle pressure until the RAM clicks into place.
9. Connect the Power Supply
Locate the main power connector (usually a 24-pin or 20+4-pin connector) on the motherboard. Connect the corresponding power cable from the power supply to this connector. Additionally, connect the CPU power connector (usually a 4-pin or 8-pin connector) to the designated socket on the motherboard.
10. Connect Storage Devices
Connect the SATA cables from the storage devices (hard drives or solid-state drives) to the SATA ports or M.2 Slots on the motherboard. Ensure that the cables are securely plugged in on both ends.
11. Connect other Peripherals
If you have additional peripherals like graphics cards, sound cards, or network cards, follow the manufacturer’s instructions to install them in the appropriate expansion slots on the motherboard.
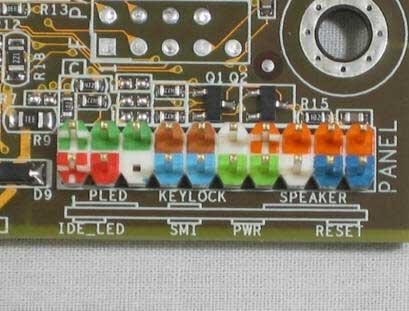
12. Connecting Front Panel Components
The next part of motherboard installation is connecting the LEDs, buttons, and front-mounted ports on the front of the box. This is sometimes easier to do before you install the motherboard fully in the case. You can trace the wire leads from the front of the case to the appropriate standoffs on the motherboard. These usually include the following:
- Soft power button
- Reset button
- Speaker
- Hard drive activity light
- Power light
- USB
- Sound
These wires have specific pin connections to the motherboard. Although you can refer to the motherboard book for their location, usually a quick inspection of the motherboard will suffice for an experienced tech.


13. Latest Important Details
You need to follow a few rules when installing these wires. First, the lights are LEDs, not light bulbs; they have a positive side and a negative side. If they don’t work one way, turn the connector around and try the other. Second, when in doubt, guess. Incorrect installation only results in the device not working; it won’t damage the computer. Refer to the motherboard book for the correct installation. The third and last rule is that, with the exception of the soft power switch on an ATX system, you do not need any of these wires for the computer to run.
It is advisable to install the CPU, CPU fan, and RAM into the motherboard before installing the motherboard into the case. This helps in several ways, especially with a new system. First, you want to make certain that the CPU and RAM work well with the motherboard and with each other—without that, you have no hope of setting up a stable system. Second, installing these components first prevents the phenomenon of flexing the motherboard. Some cases don’t provide quite enough support for the motherboard, and pushing in RAM can make the board bend. Third, attaching a CPU fan can be a bear of a task, one that’s considerably easier to do on a table top than within the confines of a case. A lot of third-party CPU fan and heat-sink assemblies mount on brackets on the bottom of the motherboard, requiring installation before placement in the case.
14. Screw the Motherboard to the Case and Test it
Finally, install the motherboard into the case fully and secure it with the appropriate screws. Once you get the motherboard mounted in the case, with the CPU and RAM properly installed, it’s time to insert the power connections and test it. A USB POST Card Tester can be helpful with the system test because you won’t have to add the speaker, a video card, monitor, and keyboard to verify that the system is booting.
If you don’t have a POST card, install a keyboard, speaker, video card, and monitor. Boot the system and see if the BIOS information shows up on the screen. If it does, you’re probably okay. If it doesn’t, it’s time to refer to the motherboard book to see where you made a mistake.
If you get no power at all, check to make sure you plugged in all the necessary power connectors. If you get power to fans but get nothing on the screen, you could have several problems. The CPU, RAM, or video card might not be connected to the motherboard properly. The only way to determine the problems is to test. Check the easy connections first (RAM and video) before removing and reseating the CPU.
Expansion Cards Installation
To successfully install an expansion card, you first need to make sure that your motherboard has the appropriate slot for that card and that it works with your operating system. Next you must provide the drivers for that operating system and finally you must verify that the card works correctly on the PC.
The previous procedure applies to all types of expansion cards, the most common being video, sound and network cards.
Here’s a basic procedure for installing an expansion card, such as a graphics card or sound card, into a desktop computer:
1. Preparation
Before you begin, turn off your computer and unplug the power cord. Also make sure you are working on a clean, static-free surface to avoid damaging components. If possible, use an antistatic wrist strap properly connected to the PC, as indicated in the “Work Safety, Professionalism and Tools” post.
If you don’t have a wrist strap, you can use the technical way to avoid ESD by touching the power supply or PC case (as also recommended in the mentioned post) after removing the expansion card from its antistatic bag. This places you, the card, and the PC at the same electrical potential and therefore minimizes the risk of ESD.
2. Identify the Expansion Slot
Locate the empty expansion slot on your computer’s motherboard where you plan to install the card. Common slots are PCI Express (PCIe) for graphics cards and PCI for other types of expansion cards.
3. Remove Cabinet Cover
If the expansion slot is covered by a metal plate on the computer case, remove it by unscrewing the screws securing it.
4. Prepare the Expansion Card
Remove the card from its packaging and be sure to handle it carefully to avoid damage. If there is a plastic protector on the connectors, remove it carefully.
5. Alignment
Carefully align the expansion card connectors with the expansion slot on the system board. Make sure they match correctly and the card is straight.
6. Facility
Carefully insert the card into the expansion slot. Apply even, constant pressure until the card is fully inserted into the slot.
7. Fixation
If the card has a metal bracket that attaches to the case, secure it by screwing in the provided screws. This will help keep the card in place and prevent it from moving.
8. Power Connection (if required)
Some expansion cards, such as high-end graphics cards, may require an additional direct power connection from the computer’s power supply. Be sure to connect any necessary power cables to the card.
9. Cabinet Closing
Replace the cabinet cover and secure it with the corresponding screws.
10. Connection of Peripherals
Connect any necessary cables or peripherals to the expansion card, such as monitor cables, audio cables, etc.
11. Power on and Test
Reconnect the power cable and turn on the computer. Verify that the expansion card is recognized by the operating system. Make the necessary configurations by installing the card drivers.
Motherboard Troubleshooting
Not often, but motherboards and motherboard components can die from many causes: time, dust, cat hair, or simply slight manufacturing defects. Installing cards, electrostatic discharge, flexing the motherboard one time too many when swapping out RAM or drives—any of these factors can cause a motherboard to fail. The motherboard is a hard-working, often abused component of the PC.
If you encounter any issues with your motherboard, here are some common troubleshooting steps to help you resolve them. First and foremost, always check the connections. Ensure that all cables and connectors are properly connected and seated. Loose connections can cause various problems, including intermittent power supply or data transfer issues.
If checking the connections doesn’t solve the problem, it’s a good idea to test individual components. For example, if you suspect that the RAM module is faulty, you can try removing it and testing it in a different slot or using a different module altogether. Similarly, if you suspect that the graphics card is causing issues, you can try using a different card to see if the problem persists.
Updating drivers is another important step in troubleshooting motherboard issues. Outdated or incompatible drivers can cause stability or performance problems. Make sure that you have the latest drivers installed for all your hardware components. You can usually find the drivers on the manufacturer’s website.
Seeking Professional Help
If none of the above steps work, you can try resetting the BIOS to its default settings. Sometimes, incorrect BIOS settings can cause compatibility or stability issues. Refer to the motherboard’s manual for instructions on how to reset the BIOS. Keep in mind that resetting the BIOS will revert any custom settings you may have made, so it’s a good idea to jot down any important settings before proceeding.
If you’ve tried all the troubleshooting steps and are still unable to resolve the issue, it may be time to seek professional help. Surely this is and will be the first and last time that you require professional external help (because you are starting your learning in this field of Computing) since very soon you will have the required knowledge, skills and experience and you will be able to solve this and all problems, that come your way by becoming a Professional Technician. A professional technician will have the knowledge and tools to diagnose and fix complex motherboard problems. They can also provide guidance on whether it’s more cost-effective to repair or replace the motherboard.
Remember, installing and troubleshooting a motherboard requires careful attention to detail and adherence to manufacturer’s instructions. By following the steps outlined above and seeking professional help when needed, you can ensure a smooth installation process and resolve any issues that may arise.