Canva is a powerful design tool that attends to a wide range of users, from individuals looking to create eye-catching social media posts to businesses needing professional marketing materials. Its user-friendly interface, extensive template library, and rich set of design tools make it a versatile platform that can meet various design needs.
Whether you’re a freelancer, a business owner, an educator, or part of a nonprofit organization, Canva offers features that can enhance your design capabilities and streamline your workflow.
Starting at age 44, your energy, metabolism, and overall well-being may be silently declining. Don’t wait for symptoms.
In the world of digital design, Canva has emerged as a revolutionary tool that democratizes graphic design, making it accessible to everyone from novices to seasoned professionals. With its user-friendly interface and a vast array of features, Canva has become a go-to platform for creating visually appealing content. This blog delves into the intricacies of Canva, exploring its features, benefits, and the diverse ways in which it can be used to enhance your design projects. Canva, above all, is a very visual, easy-to-use and very fun platform.
In the world of digital design, Canva has emerged as a revolutionary tool that democratizes graphic design, making it accessible to everyone from novices to seasoned professionals. With its user-friendly interface and a vast array of features, Canva has become a go-to platform for creating visually appealing content. This blog delves into the intricacies of Canva, exploring its features, benefits, and the diverse ways in which it can be used to enhance your design projects. Canva, above all, is a very visual, easy-to-use and very fun platform.
What is Canva?
Canva is a design platform where you can create your own designs using a drag-and-drop system. It includes hundreds of thousands of images, elements, fonts, shapes, and templates – most are available for free, but you can upgrade to a paid subscription to get access to everything.
Things you can create include social media designs, book covers, calendars, planners, t-shirt designs, and posters. Each type of design has its own size within Canva, so you can choose the size, pick a suitable template, and start designing. Templates and elements are created by freelance designers and Canva’s in-house designers. It’s a multi-purpose platform, meaning it’s available as a website, desktop app, and mobile app, all connected to help make designing easier for the average user.
Free vs. Pro Canva: What’s the Difference?
The free account gives you access to many features to start designing right away. The Pro account is paid and gives you access to everything, including some amazing features that are really useful for those who want to use Canva professionally.
Setting Up Your Canva Account
To set up a Canva account (if you don’t already have one), follow these steps:
1. Go to www.canva.com on your computer or tablet; once there, you’ll see the screen shown in the figure below (it is possible that a different screen is displayed since Canva, like any other online platform, changes the home page regularly):
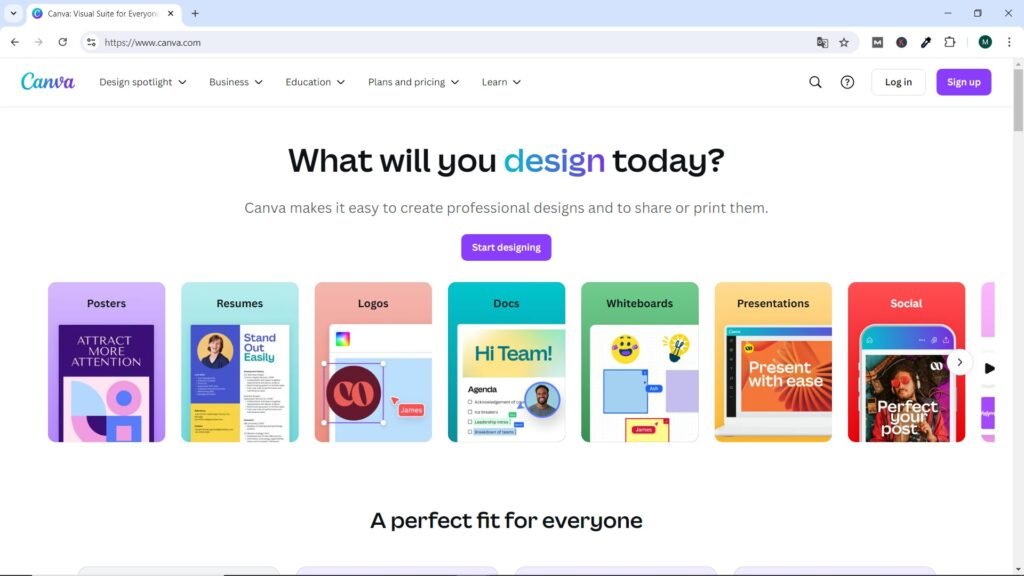
You then have the option to sign up for a free Canva account or start a free 30-day trial of the Pro version. We recommend opting for the free account with the intention of trying out the free trial later once you’re familiar with the platform.
2. Next, select the Sign Up button in the top right corner and a pop-up window will appear as shown in the figure.
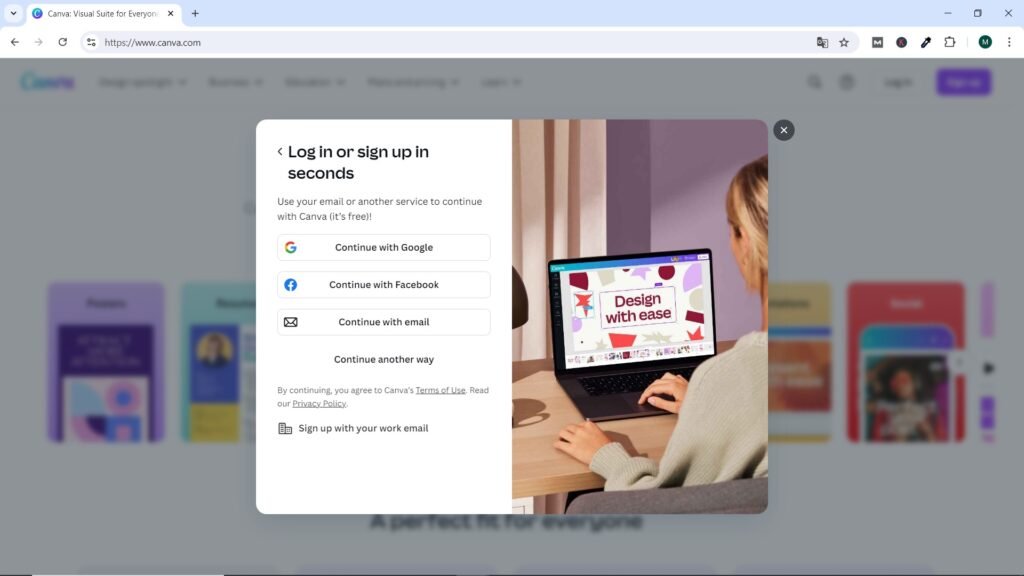
You’ll then be able to select how you’d like to sign up. We recommend using an existing email address by clicking the appropriate box. This will take you to a password screen where you can create a secure password for the account.
3. You’ll then be taken to the Canva home screen where you can set up your new account – it will look like this:
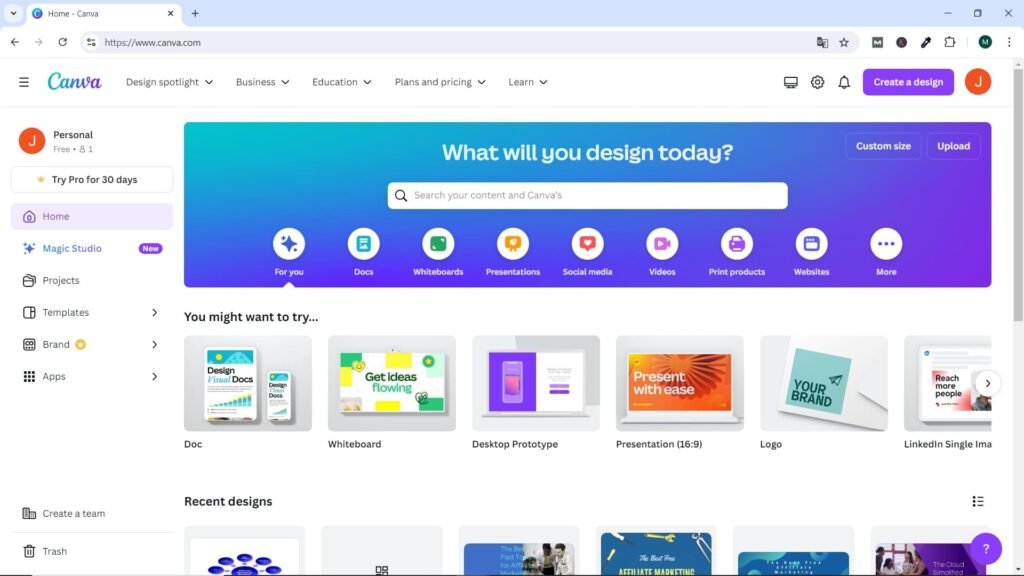
Once you’ve set up your new account and logged in, it’s a good idea to take a look around, check out the menu on the left, scroll through the sections below the search bar in the middle, and familiarize yourself with the layout of the home and design screen. Don’t worry about diving too deep into the features for now.
Setting Up Folders
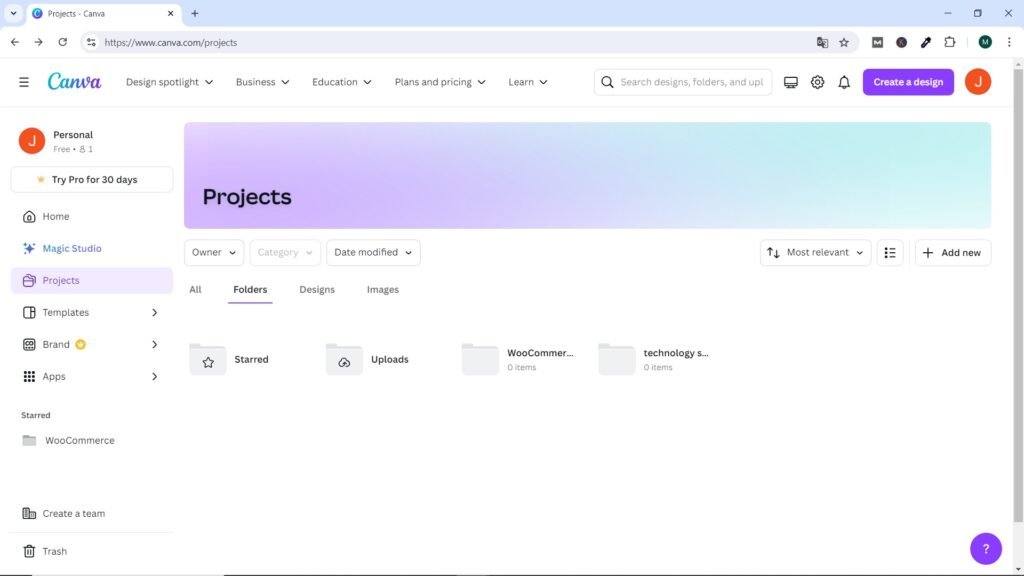
In Canva, you can create folders to organize your designs in various parts of your business or personal life, view your recent designs, and quickly see uploaded content, all in the Your Projects tab. You can find it in the left menu, under the new Magic Studio tab.
The order of the sections on this page is as follows:
- Recent
- Folders
- Designs
- Images
- Videos
This can be seen in the screenshot below:
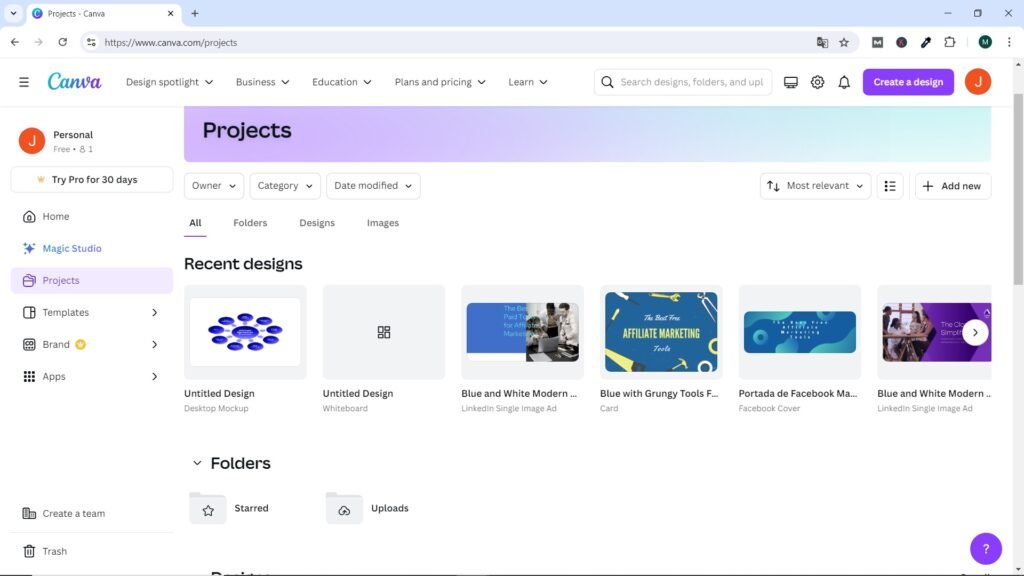
Scroll down the page and you’ll see everything you’ve uploaded or created here. This is the best place to access everything, a central hub for your account.
Creating folders
You already have three folders in your account, as follows:
- Purchased: Anything you’ve purchased outside of the Pro subscription
- Featured: Any items or images you’ve marked as favorites and want to use later are saved here
- Uploads: Anything you upload to your account, including images and videos
With the Pro and Free versions, you have unlimited folders along with the three existing ones mentioned above, and you can name them whatever you like. To create a new folder, follow these instructions:
1. Click the cross in the top right corner. This will open an Add New menu:
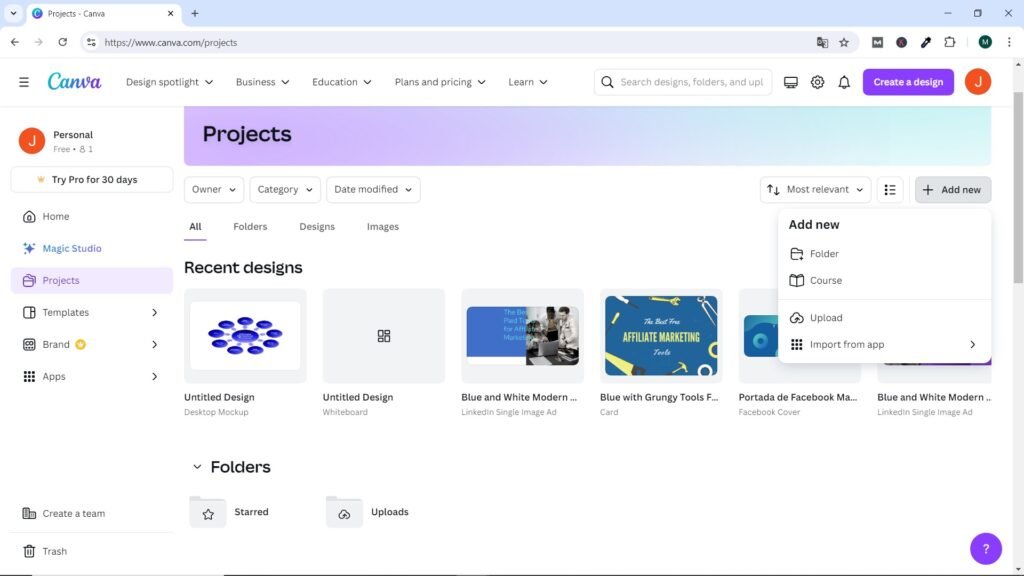
2. Click on the Folder icon.
3. Add a name for your folder:
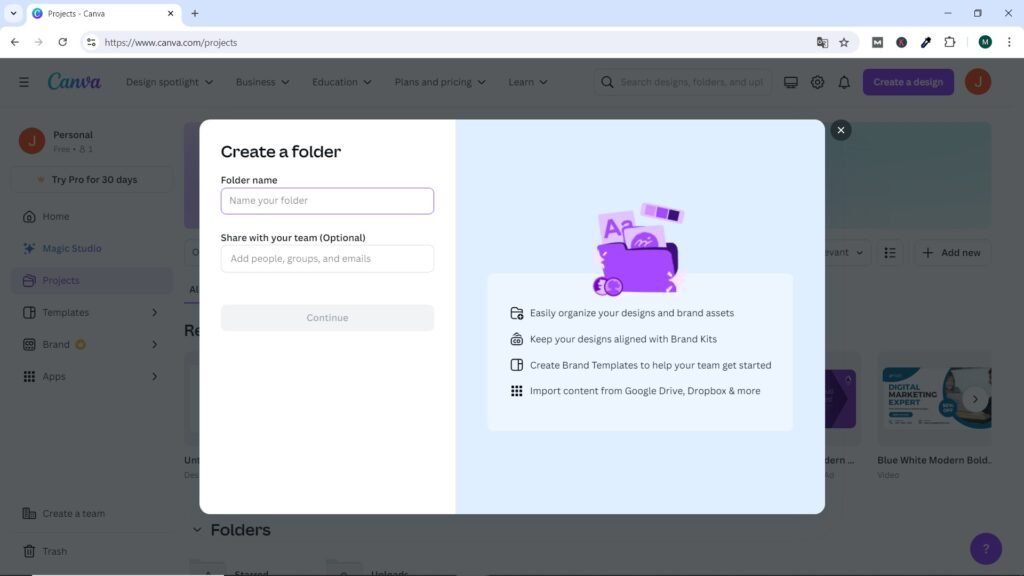
Ignore the second option unless you are creating a team.
4. Then, select the Continue button at the bottom.
5. You will now add your folder to the Folders section on the page. You can customize a folder by clicking the three dots next to it:
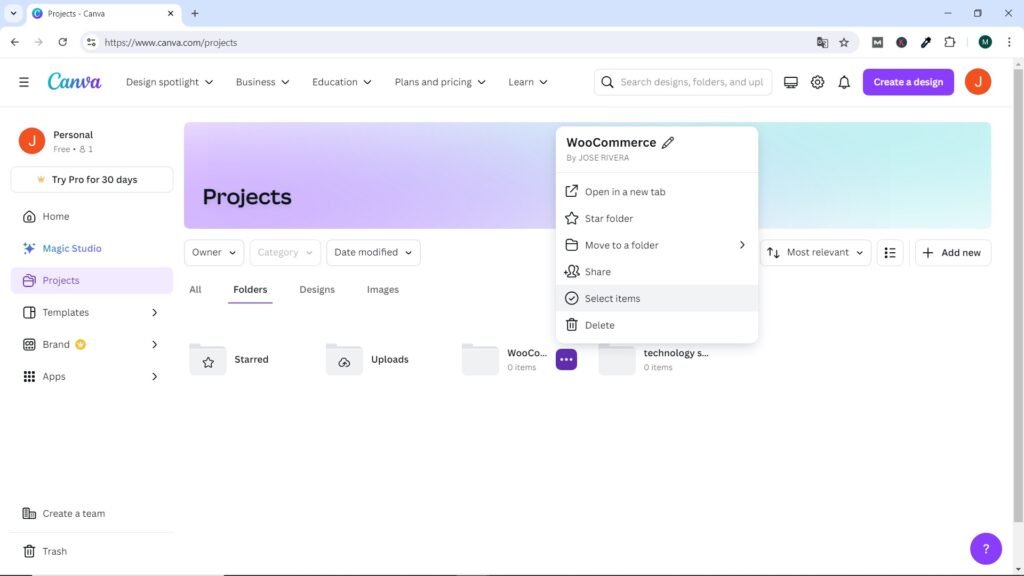
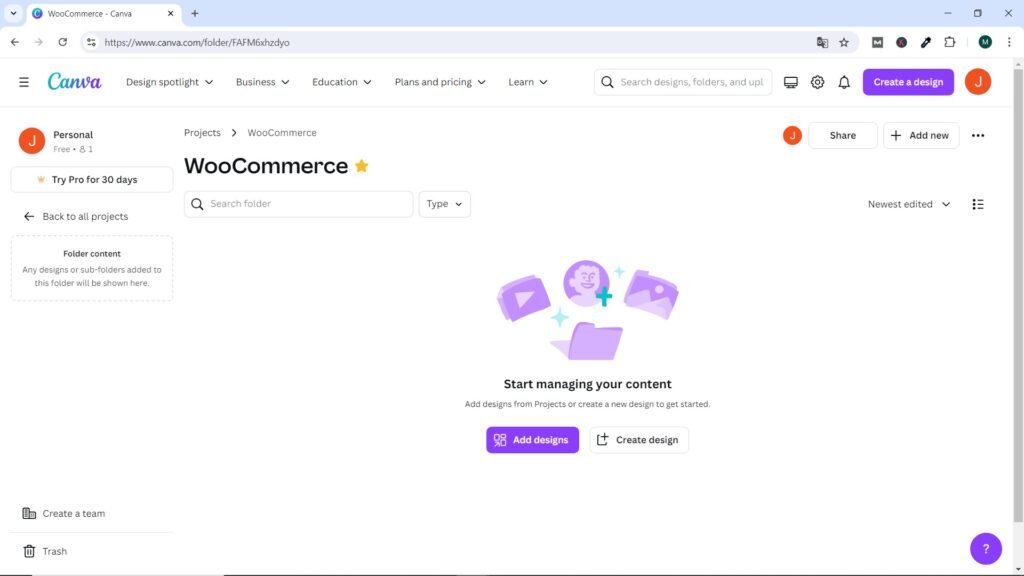
It is also possible to convert your new folder to a top level folder by clicking on the 3 dots to the right of it as in the previous step (5) and selecting the Star folder option (icon) next to its name, which will turn the star yellow. It will now appear in the main menu on the left bar as a favorite folder. This is perfect for all users and you can create as many folders as you like. You can also create folders within folders (subfolders) up to five levels deep for additional organization.
In the following image you can see that the folder called WooCommerce has been converted to Top Level and is located in the main menu on the left bar of the Canva Dashboard, within the Starred classification.
Discover and Edit Canva Templates
Templates and their ease of use are the main draw of Canva. It has thousands of business and home templates, from social media posts to poster designs, logos, and t-shirts. Along with templates, you also have elements and images that you can add to your template to help make it unique and fit your business or create a design from scratch, making Canva a very versatile platform.
Let’s head over to the Canva dashboard. From here, you have a couple of options to find your template. Use the Create a Design button in the top right corner or the search bar in the middle.
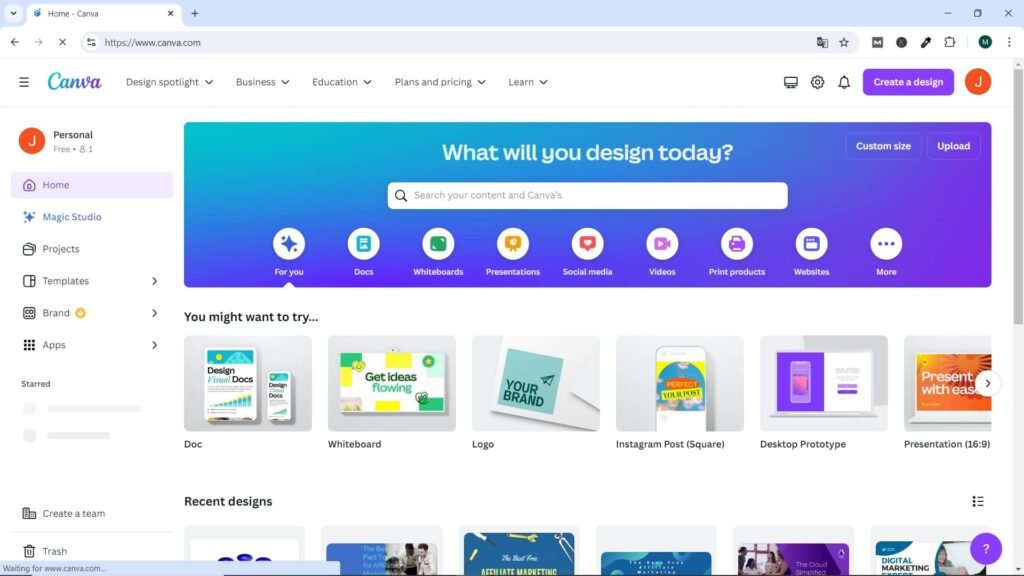
If you know what you want to search for, for example Social Media, you can use the search bar, but if you’re not sure, select the Create a Design button and it will give you a dropdown menu to choose from:
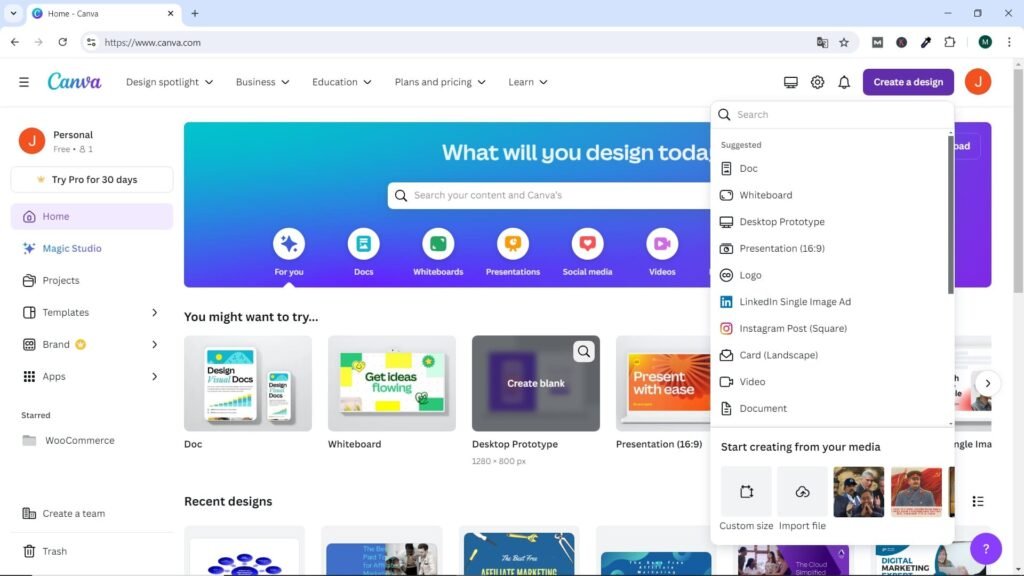
Here we have several options. You can search for a template, select an option from the dropdown menu, create a custom-sized template, or import a file directly into Canva. This option allows you to upload a PDF document, which will be converted into a fully editable design.
For this example, we’re going to select a Facebook post from the dropdown menu. Facebook and Instagram posts are perhaps the most commonly used templates in Canva. Once selected, a new screen will open giving you the option to create from scratch or select a template.
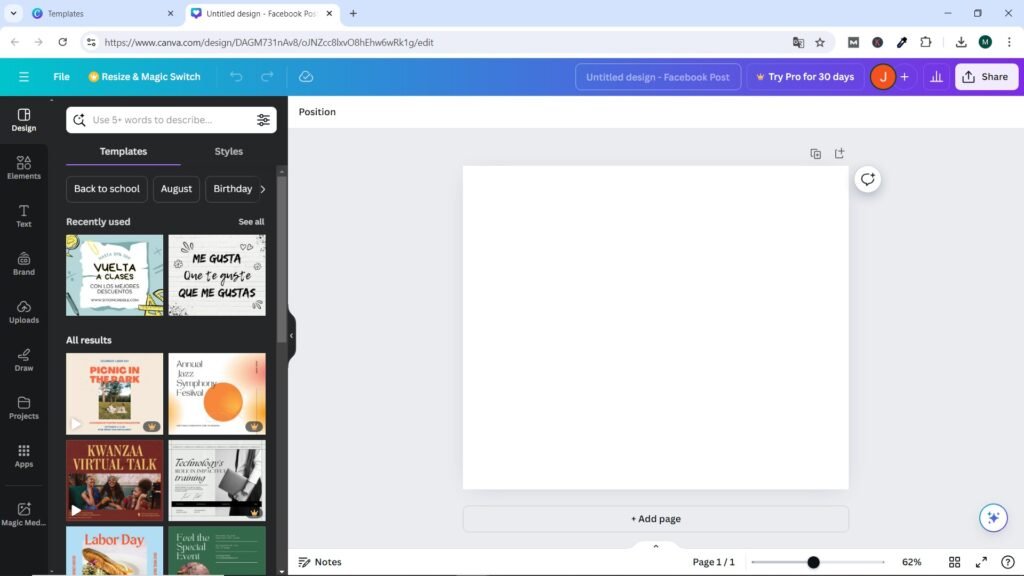
Selecting and Editing a Template
The Templates option in the upper left corner lists the available templates, starting with the most recently used ones and then all the results sorted by most popular. Scroll through them to get a feel for what’s available and see if there’s one that catches your eye. You can also choose a template category using the options at the top; for example, we have Back to School, August, Birthday, etc.
You can find out if a template is available for your plan by hovering over it – a crown icon will appear at the bottom of the image if it’s available for Pro only, or nothing if it’s available for both free and Pro accounts.
As an example, let’s select a template from the options on the left (in this example we chose the School/Online education category) for our design. Canva will automatically display the template in the blank templates screen on the right where you can edit it to suit your business.
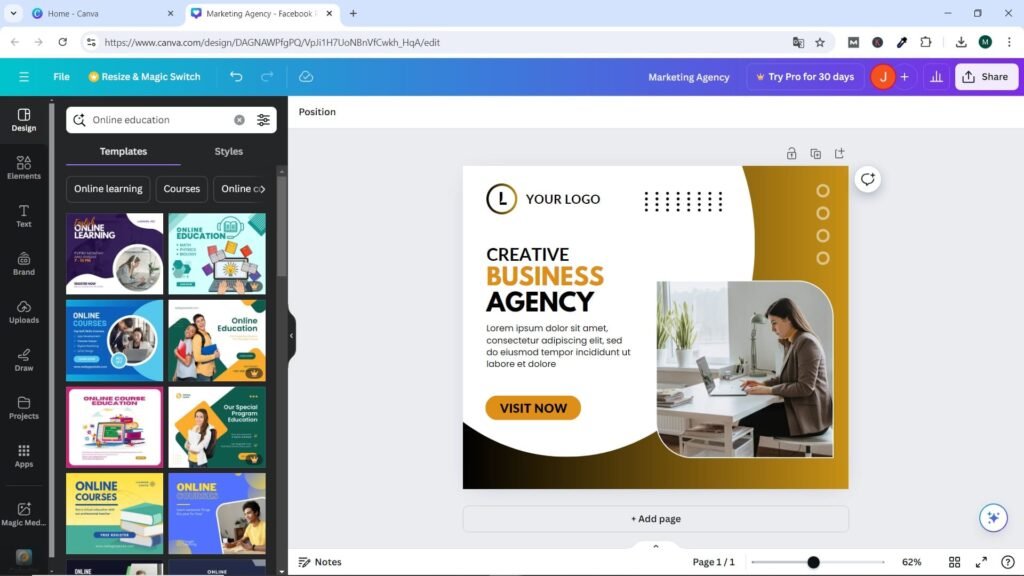
You could use this template as is with minimal changes like add the logo and contact forms. If you hover over the template, you’ll see lots of purple squares appear. These represent every element, shape, image, and block of text that’s within your design. To modify any of them, just click on it and proceed.
Canva has an auto-save option, so you don’t need to worry about saving your designs, but if you want to, click the File tab at the top and scroll down to Save.
Color Change
Follow these steps to edit a template in Canva:
1. First, let’s start with the color options. We’re going to change the background colors of our design. You can do this by selecting the color block to modify (a purple box appears) and then clicking on the color block icon in the top left corner.
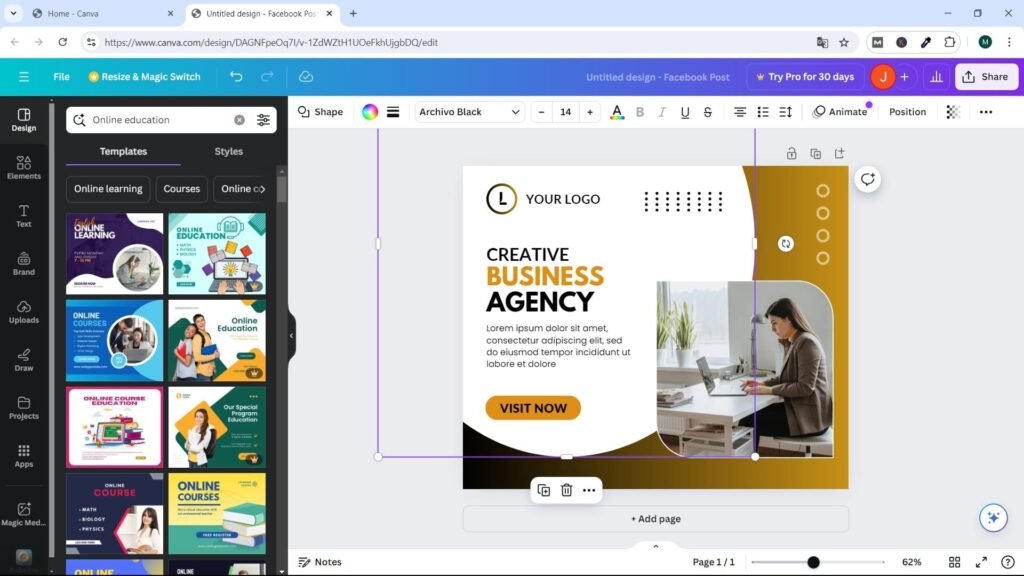
2. This will bring up the color palettes, which include your brand colors, colors taken from photos, default colors, and the option to create your own color.
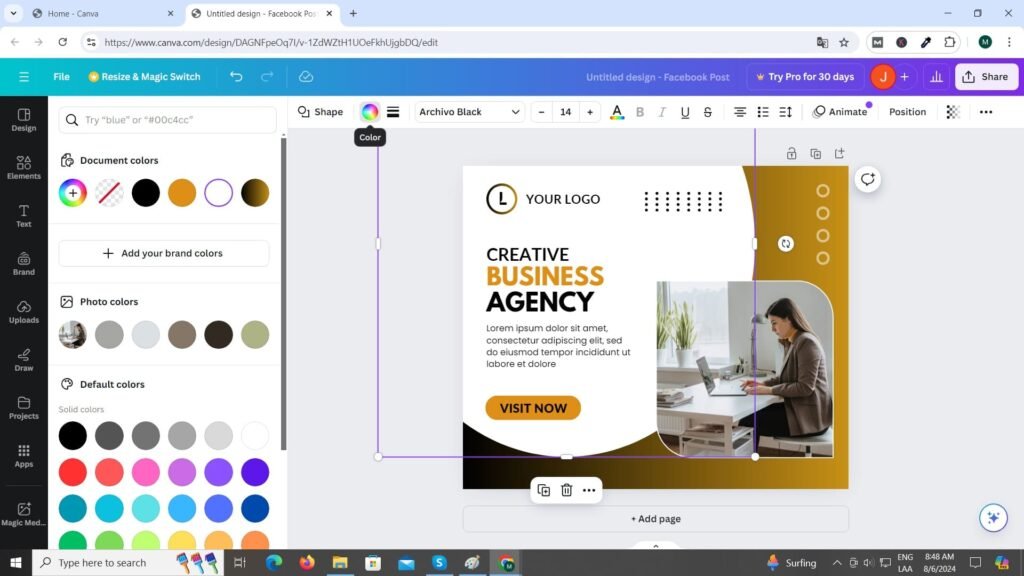
3. Select the icon with the + sign inside in the Document Colors section, as this will allow you to choose your own color. You can now move the white circles around to find the ideal color for your shape.
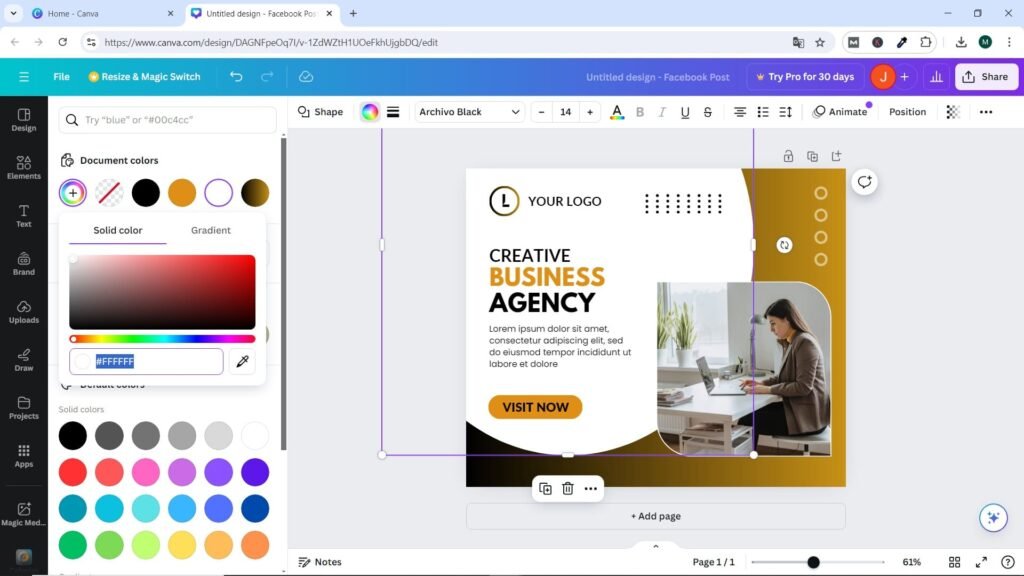
4. As you move the circles, you’ll notice the color of your design changes, so you can see what it will look like before you select it.
5. Once you’ve decided on a color, simply move your cursor away from the color box and the option will remain on your design.
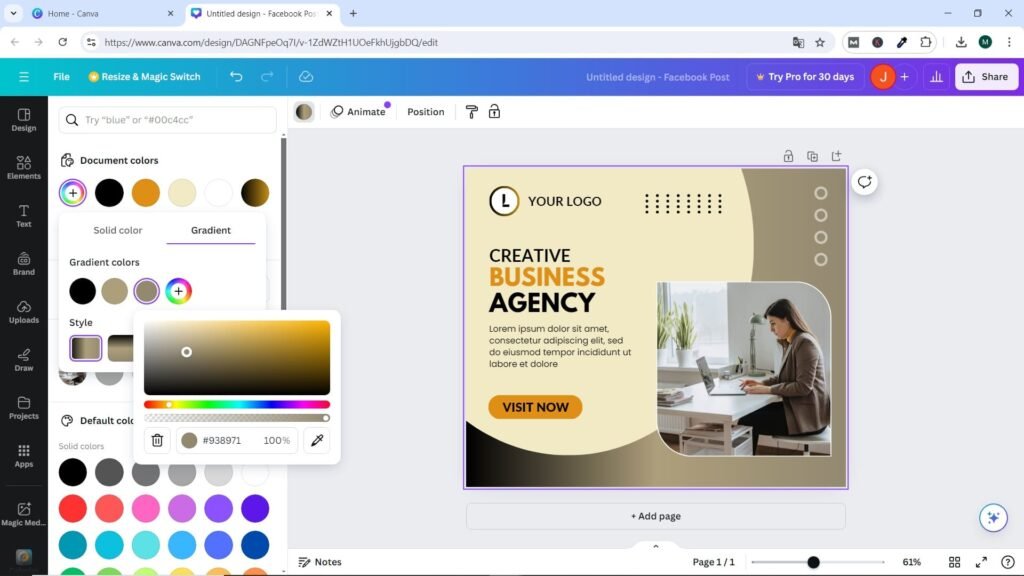
You can now repeat the same steps for any other part of your design. This will also work for changing the color of fonts and icons.
Changing Images in a Template
Changing images is a good idea, as you can use ones that fit your brand. Canva has a huge number of images available in its library for you to use. Many of these are available for both Free and Pro accounts. You can find out if an image is available for your plan by hovering over the image – a crown icon will appear at the bottom of the image if it’s available for Pro only, or nothing if it’s available for both Free and Pro. Most templates will use grids and frames to change the shapes of images.
Here are the steps required to change images in templates.
1. In the left sidebar, select Elements. Scroll through the bar that contained the templates until you find the Photos option – all of the available photos will appear, including recently used, recommended, and trending photos, so you can see which ones are most used.

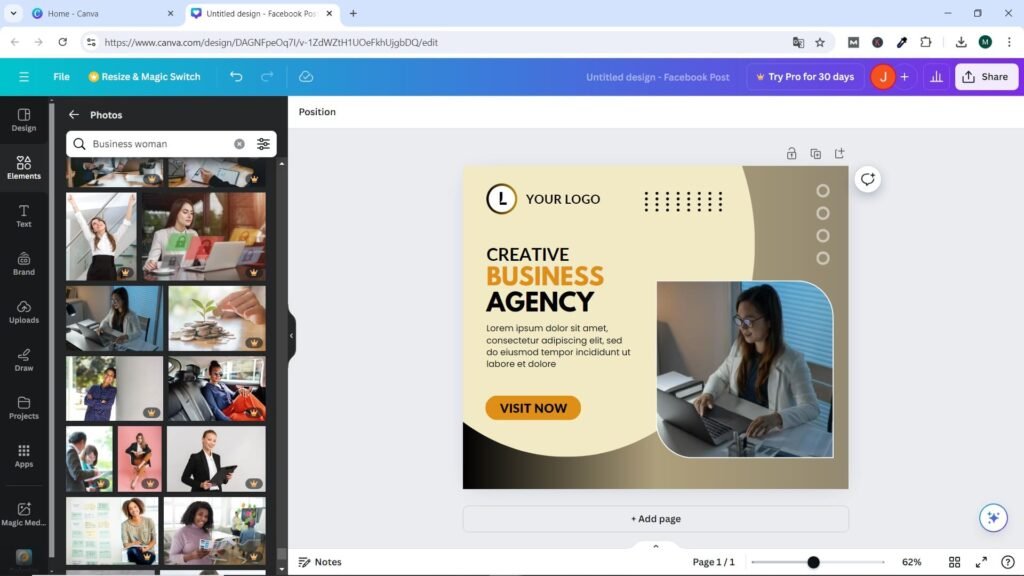
2. Here we can search for a photo, either directly in the Photos menu or by using keywords in the search box, depending on the type of image we are trying to find. In our case, we are going to search for something like Business woman to show how we can change the current image for another one of the same type, that is, of someone working in the same environment. This way we will get a variety of images to choose from.
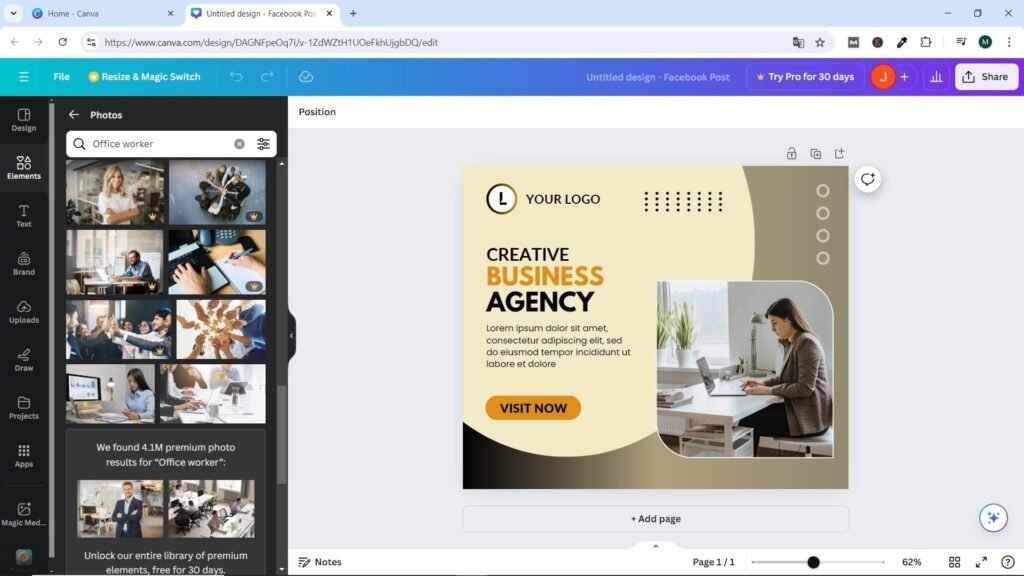
3. Now, all you have to do is select the one you like for the design. Drag and drop it to add it to the template into the box above the existing image to replace it. Repeat the same process for any other additional images you want to replace.
Changing Text and Font
Canva has hundreds of fonts available. If you use a specific font that isn’t in Canva, you can upload its file to access it. However, this feature is exclusive to the Pro version, so if you’re using the free version, you’ll have to use the available fonts. Follow these steps:
1. To change the information inside a text box, just select the box in question, then click on it again and the information will be highlighted in blue, meaning you can now type the new text directly into the box.
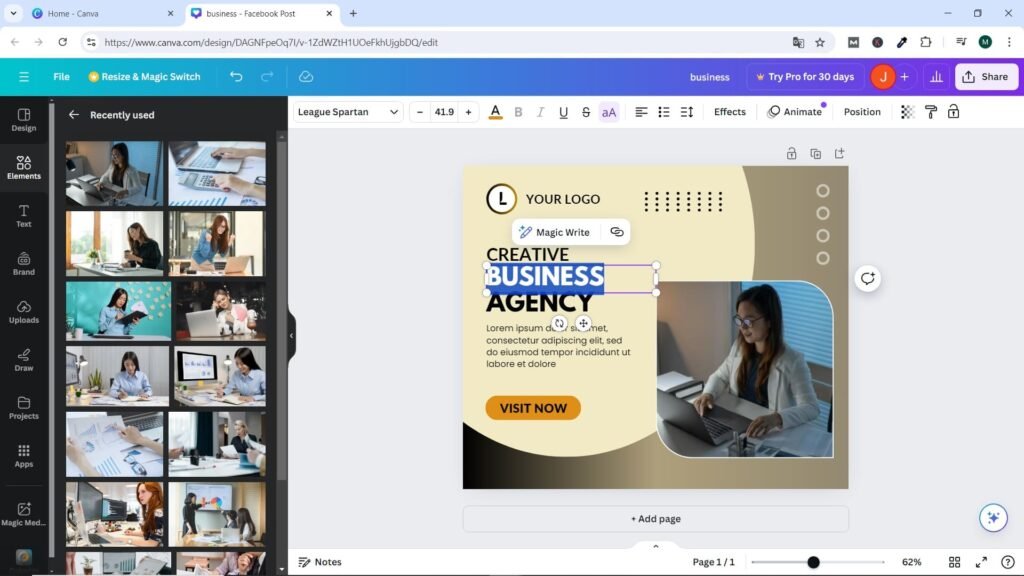
2. To add a completely new text box, you can press the T key on your keyboard or select the Text tab from the left menu, which will give you the option to add header text, subheading text, or body text to your template, with some recently used text combinations shown in the following screenshot.

3. To change the font (without changing the text box), select the text box in question, then at the top there is a bar with different options and boxes. The first one (from left to right) will give you a dropdown with all the available fonts, the second one allows you to change the font size and the third option allows you to change the color of your font.
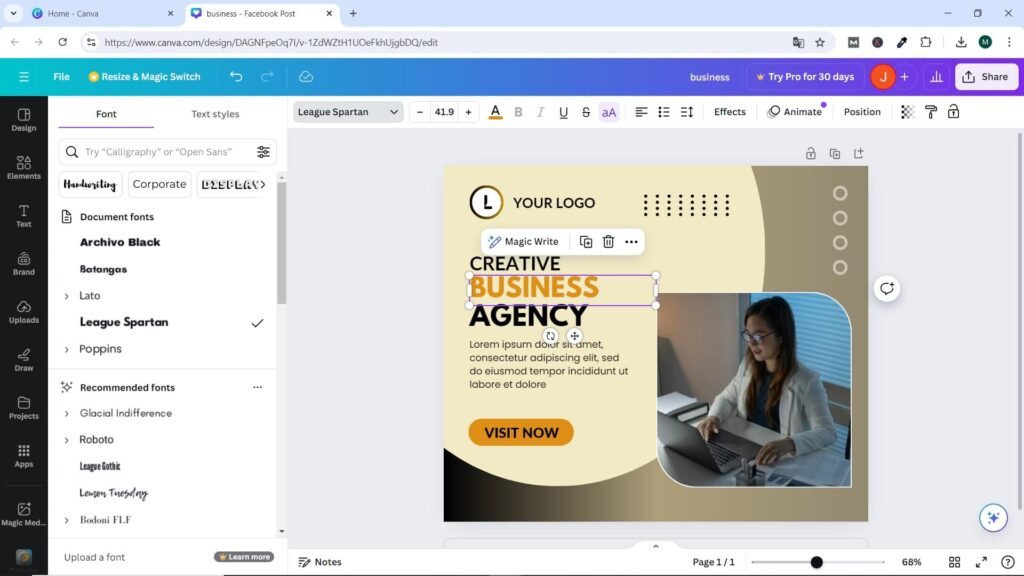
If you know your font, you can search for it; otherwise, scroll through the options to find one that suits your design.
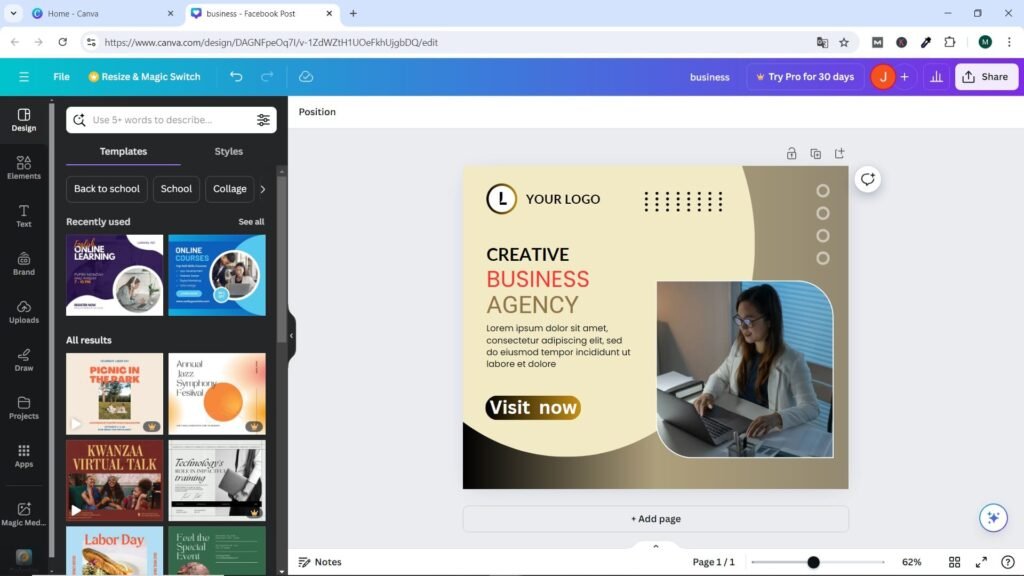
Now that we’ve changed the background color, image, and font, let’s do a comparison. Here’s what the template looked like before we edited it:

And after editing it looks like this:
Creating a Design from Scratch
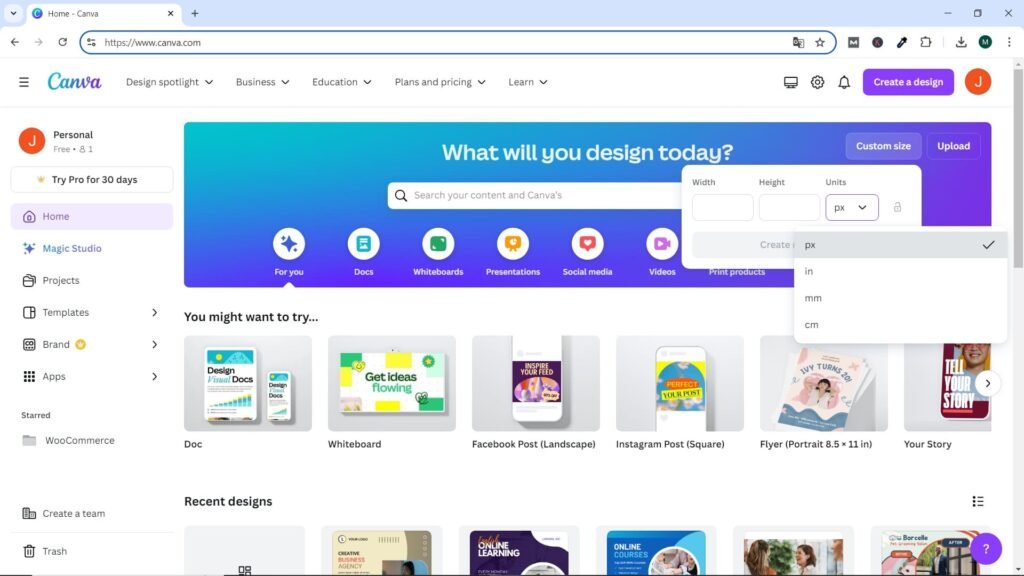
Using a template is often the quickest and easiest way to create graphics in Canva, but sometimes you need to create one from scratch, especially if you can’t find a template that matches what you’re looking for. Starting with a blank template is very similar to using a pre-made template. Click on the Create a Design tab and find the size you need. A blank template of the selected size will open. Alternatively, you can click on the Custom Size tab and you’ll be given the following size options:
px (pixels)
in (inches)
mm (millimeters)
cm (centimeters)
These are useful if you’re creating a banner, poster, book, or anything else that has a specific size you need to work with.
How to Find your Designs
All Canva designs are automatically saved as you go and saved in the Projects tab on the left menu. Once you’re done creating your design, you can close the tab and return to it later by navigating to the Projects tab and clicking Designs. Everything will be there in the order it was created, so the most recent will be displayed first.

You can also save designs to a folder for better organization and create as many as you want on both Free and Pro accounts. We’ve already talked about using folders above.
Now you can start a design from scratch with confidence. We’ve also seen how to create a custom-sized template and where they’re all stored, so you can find your designs quickly.
Using Lines and Shapes
Lines and shapes in Canva are essential to your designs. You’ll find that you use them a lot more than you ever thought; this is because lines are great for breaking up and organizing information in a design and shapes are great for giving a design a sense of balance and can help draw the viewer’s attention to important aspects.
Lines
Lines can be found in two ways. The first way is to press the L key on your keyboard and a line element will appear on the template. The second and more practical way is to click on the Elements option in the left menu, type Lines in the search box, and a variety of line types will appear.

Now we can do more with lines in Canva. At the top of the template, you’ll see a selection of options. Hover over each one to see what you can do. They include the following:
- Line Color
- Line Style
- Animation
- Line Start
- Line End
- Line Type

Line Color allows you to change the color of the line to any color you want. Shows all color palettes.
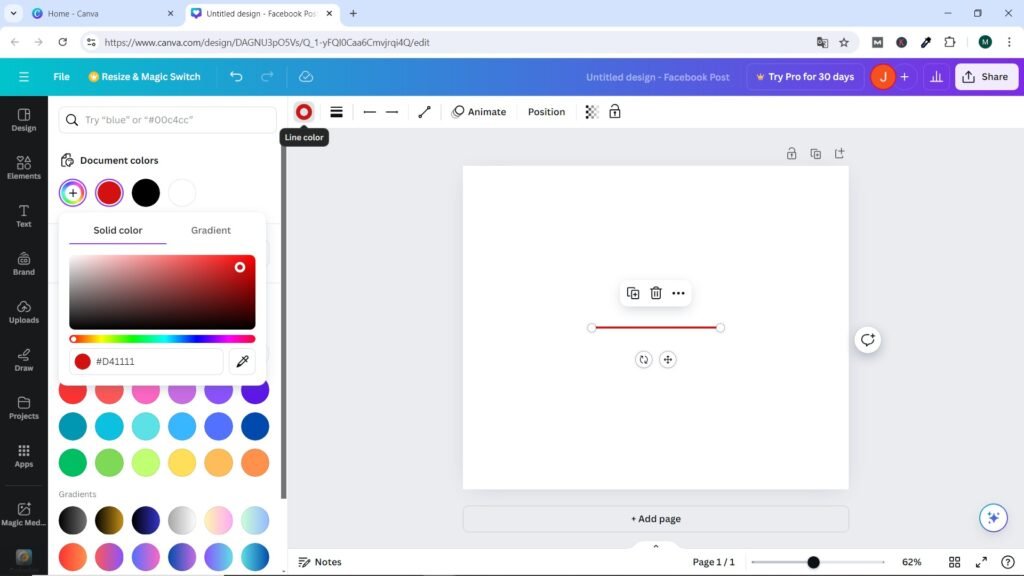
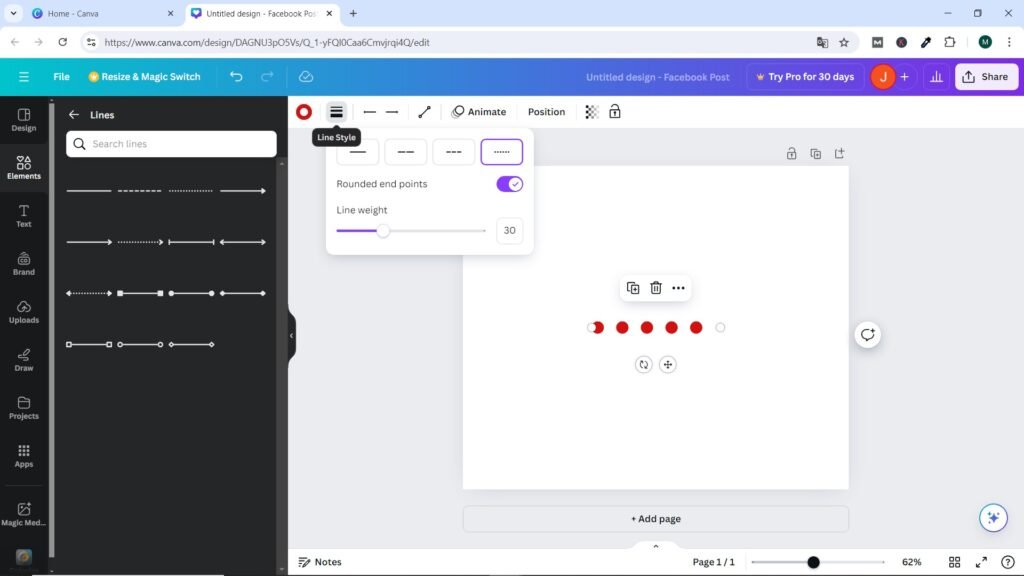
The second option allows you to change the style of the line, so you can have a solid, dotted or discontinuous line. It has a verification box to make the ends of the round line, and you can also change the thickness of the line here.
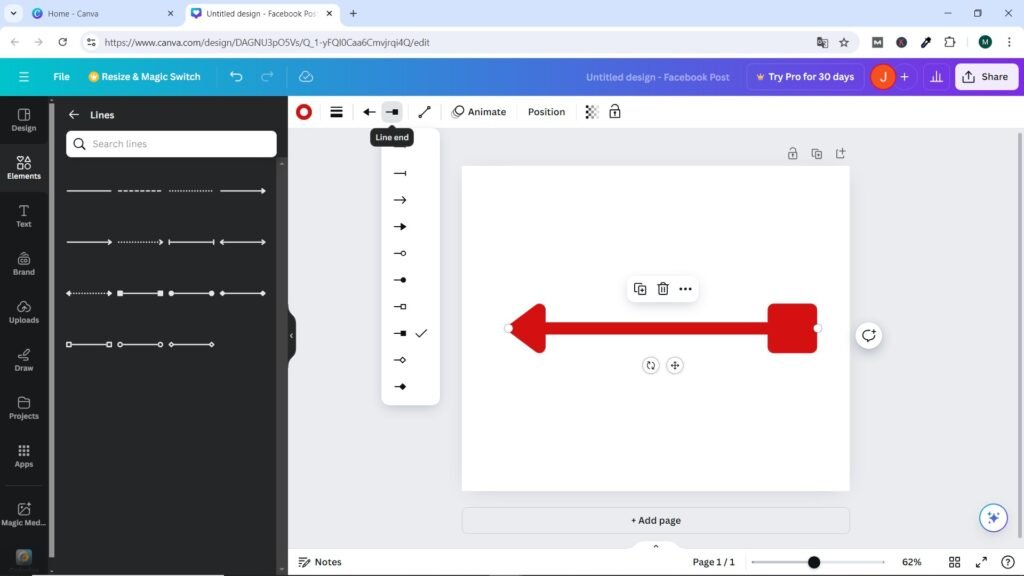
Next, we have the option to change the ends of the line, giving it a more finished appearance. There is a separate drop -down menu for the beginning and end of the line, which have the same icons, but you can change any end, left and right independently, so it can have them the same or different.
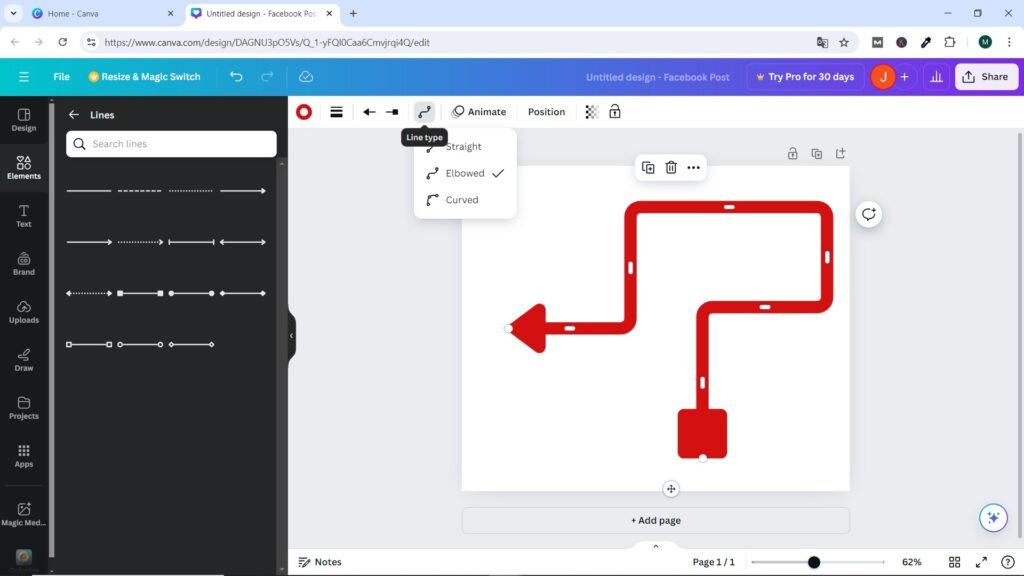
Another very interesting option allows us to make lines with elbows.
Finally, you can animate your line as you can with each element, template and image in Canva, but we will see how to do this in another post later.
Shapes
Shapes in Canva are a basic part of most designs. You will find that most templates have used a shape or two, and there are more things you can now do with shapes as Canva has added new features. You can find shapes in the same way you found the line element. There are two options: the first is to use the C key on your keyboard for a circle, and the R key in your keyword will produce a rectangle. If you are looking for more or different shapes, you can find them in the elements section by searching for the shapes keyword.
There are many different shapes. Some are simple block color squares, triangles, and circles. Others are more complex, such as having fancy borders or multiple shades within them.
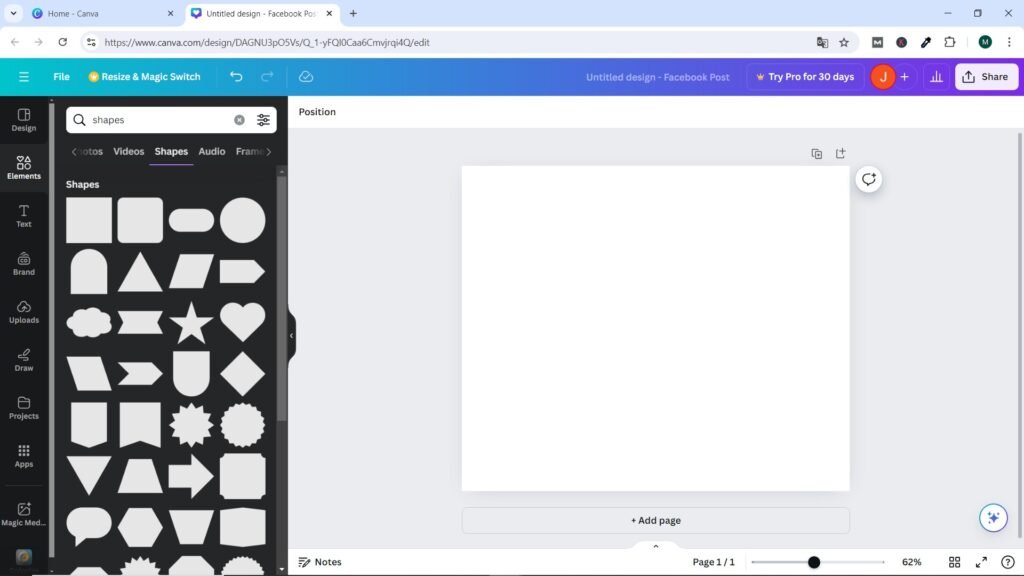
The ones we are going to look at here have an extra level of features to them. They are the basic shapes, which include squares and circles. Let us select the plain square. We can notice that a cursor appears in the center. We can now add color and text directly to the shape. If you don’t want to add text, click away from the square and the cursor will disappear.

Just like with the other elements we’ve seen, the top bar shows us all the features of the shape. This bar will change depending on the element, text box, image or shape you have selected. This shape now gives us a couple of features that are really useful. First, we can change the shape by selecting the first option in the bar, called Shape. We can automatically change the shape to any of the suggested ones in the left column.

Borders Shapes
The second feature is the third icon along the three lines next to the colored block. This is a great feature as it allows you to give your shape a border. There are five options:
- No border
- Solid line border
- Large line border
- Small line border
- Dotted border

Once you select the border option, a new icon will appear in the top bar that will allow you to change the color of your border. Below the line options, you have controls that allow you to change the thickness of your border and round the corners of your shape. We’ve changed the shape, added a dotted border, changed its thickness, and changed the colors of the border and the shape.
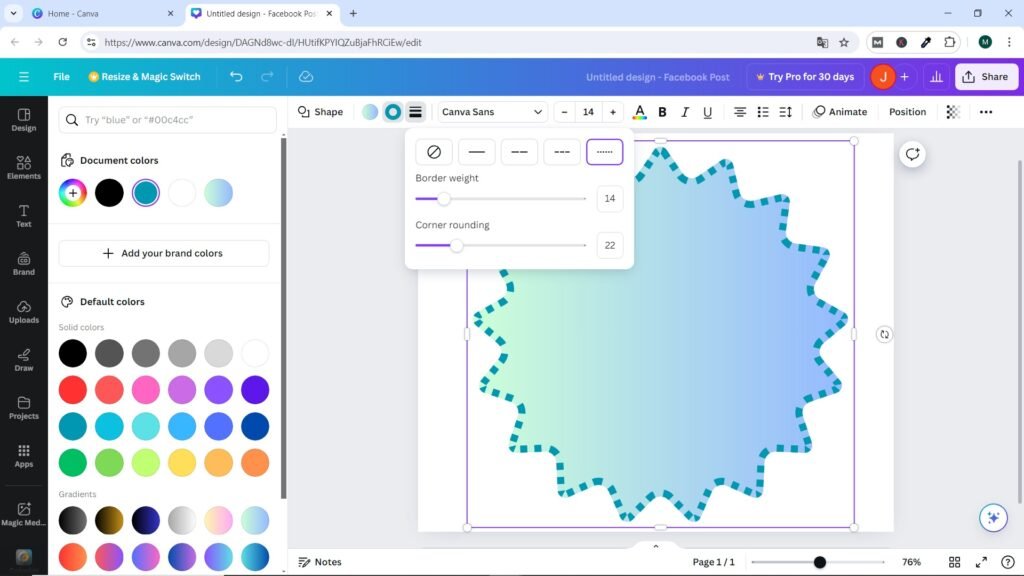
Shapes may seem boring, but they are very versatile and useful in everyday design. They work well in your business templates and it’s helpful to know how to edit them to fit your brand. You can even use shapes as a background for your text boxes as we’ll see in the next section.
Canva Text Effects and Fonts
Canva has hundreds of different fonts, so no matter what you’re creating, you’re sure to find a font that suits your design – but how do you find them and how can you make them stand out more?
The font dropdown appears once you’ve added a text box to your template. It’s the first option along the top bar. Fonts appear on the left-hand side and you can choose one via search or by scrolling, as they’re displayed alphabetically with recommended fonts, recently used fonts, and your brand’s fonts listed first.
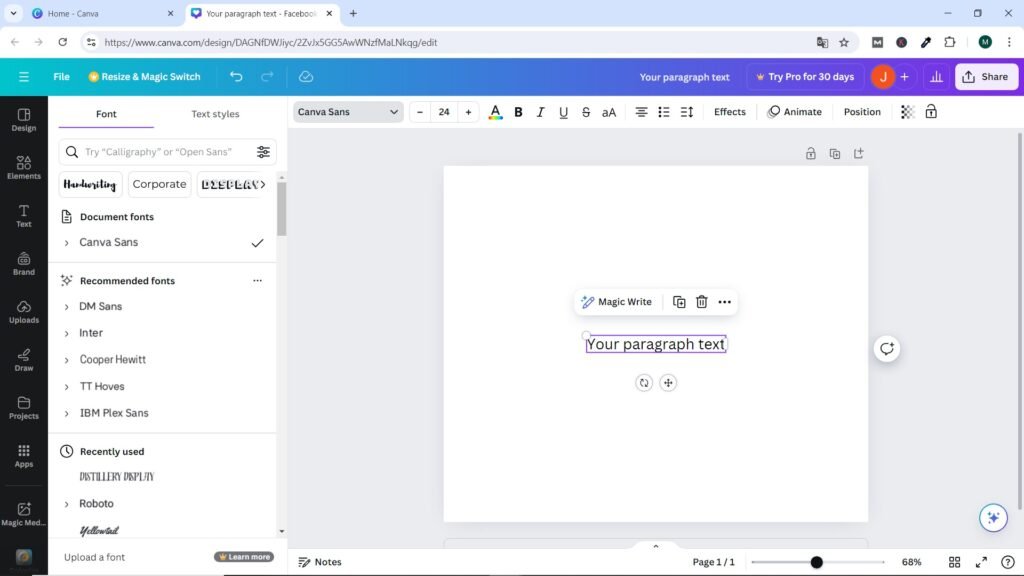
If by any chance you can’t find the font you want to use in Canva, you can also upload a font that you’ve purchased or downloaded from the internet. As long as you have the OTF or TTF files, you can upload them to Canva, but as we already mentioned, this is a feature exclusive to the Pro version of Canva.
For now, let’s find a font in Canva that we can edit. It should be a nice, easy-to-read font, as you might want to use it for a social media post. A sans serif font is a good idea.
Note: Canva’s new feature called “Magic Write” is an AI-powered writing tool that helps generate text automatically. This feature is designed to make it easier to create content such as descriptions, post ideas, emails, and more.
You can give instructions to “Magic Write” and based on your prompts, the AI will generate text accordingly. This is useful for users who are looking for inspiration, need to write quickly, or want to streamline their workflow when creating text content within Canva.
Difference Between Sans Serif and Serif Fonts
Sans serif fonts are fonts without the little feet or strokes at the end.
The following are examples of serif and sans serif fonts. Serif fonts have little feet at the end of each letter and are often used in printed material such as books, magazines, and newspapers:
Text Serif
Text Sans Serif
In the first option of the top menu bar you can choose a font style. For example, if you need an elegant font for a company name, you can select Handwriting, or if you need a more professional font for a CV, you can select Corporate. Let’s choose the Canva Sans font, a nice, thick and easy to read font.
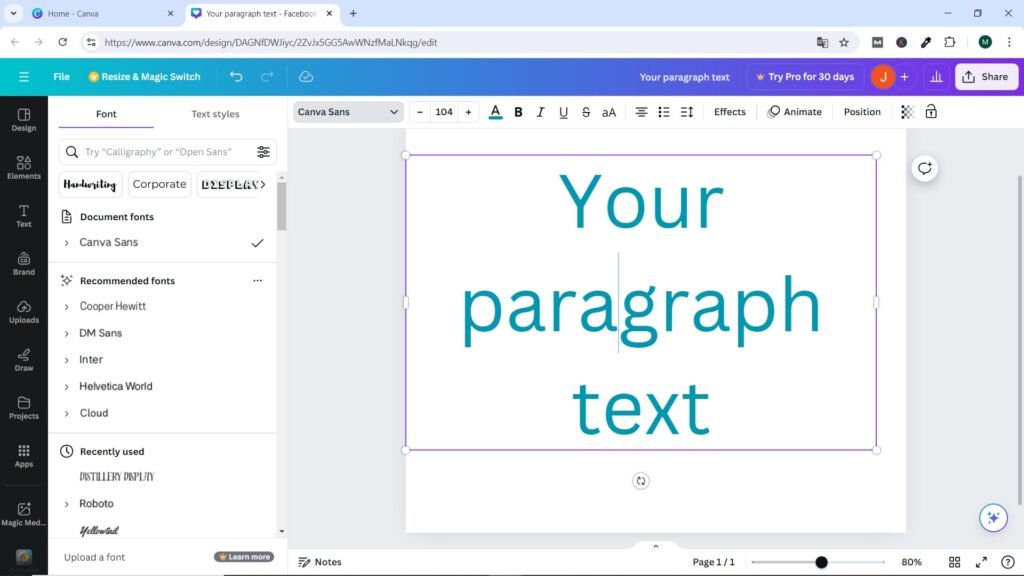
Text Effects
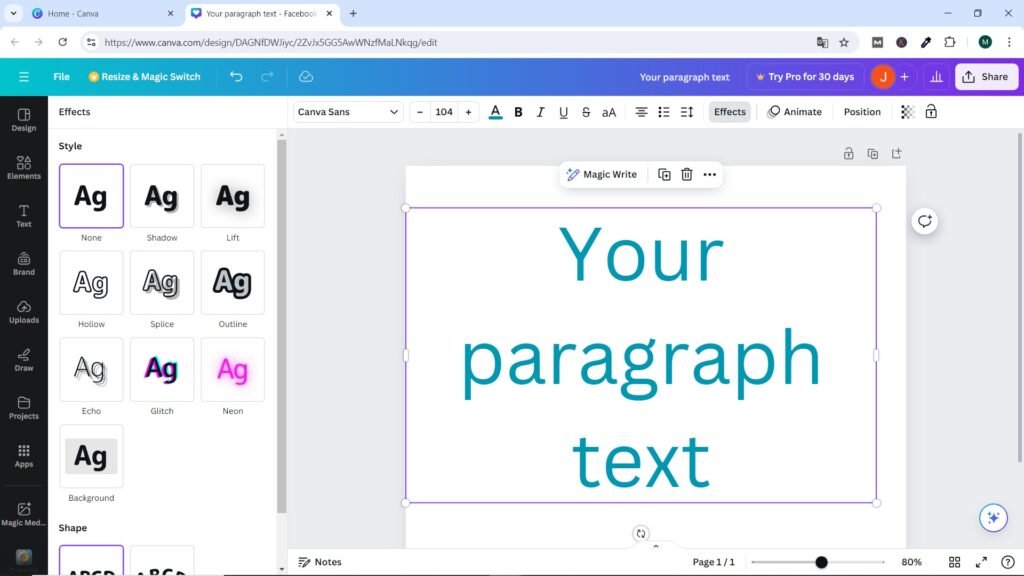
Now that we have a font that we can use in our social media posts, let’s add some flair to it. This can be done via the Effects tab. Here, you can give your font a neon glow, a background shadow, a hollow effect, and more.
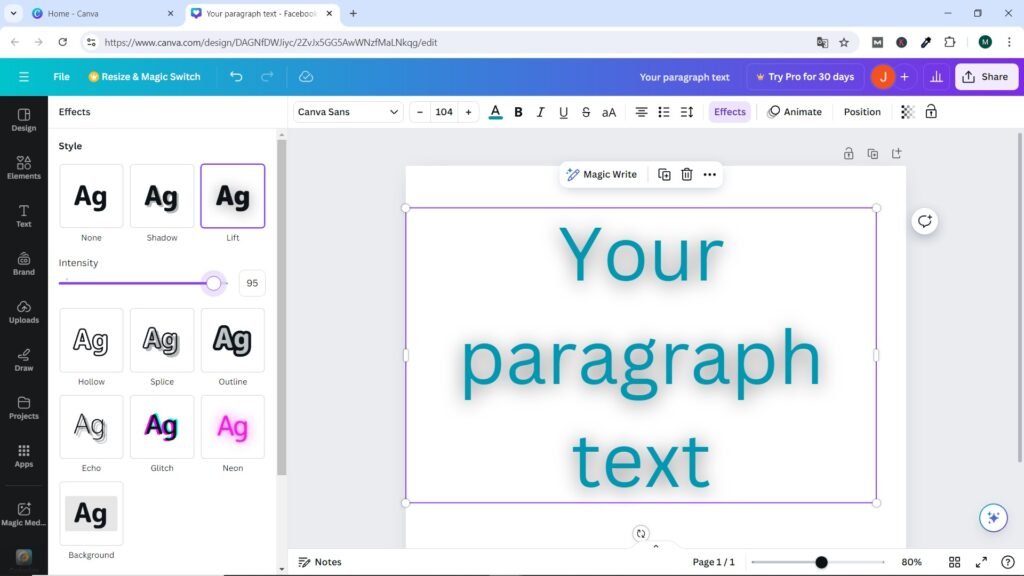
Each one of the effects has its own set of options, which you can adjust using the sliding bars. On the Lift effect, we can change the Intensity.
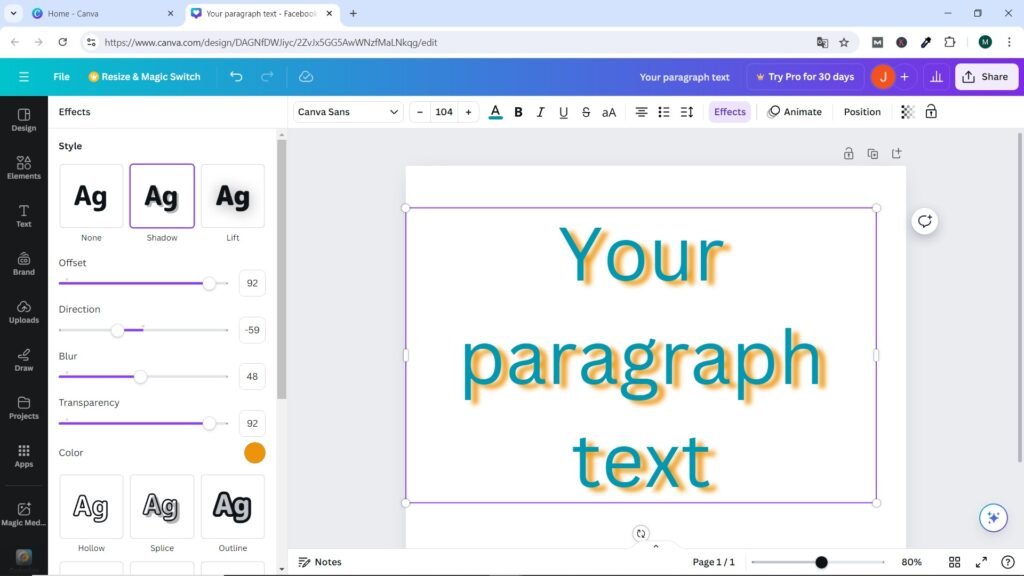
As we already mentioned, each of the effects has its own set of options, which you can adjust using the sliders. In the Shadow effect, we can change the offset of the shadow, the direction in which it flows, the blur and transparency, as well as the color of the shadow itself.
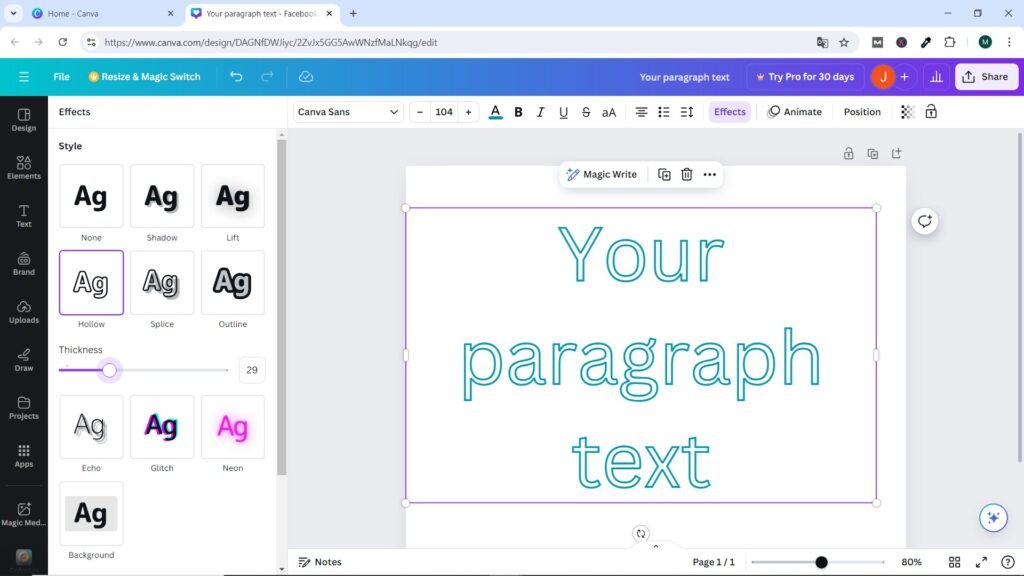
Hollow is another text effect which removes the center of the font and allows you to increase or decrease the thickness of the lines.
The best way to find out what the effects can actually do and which one will work best for your design is to look at all of them and play around with each one and the different settings or modifications that can be made to them.
Curved Text
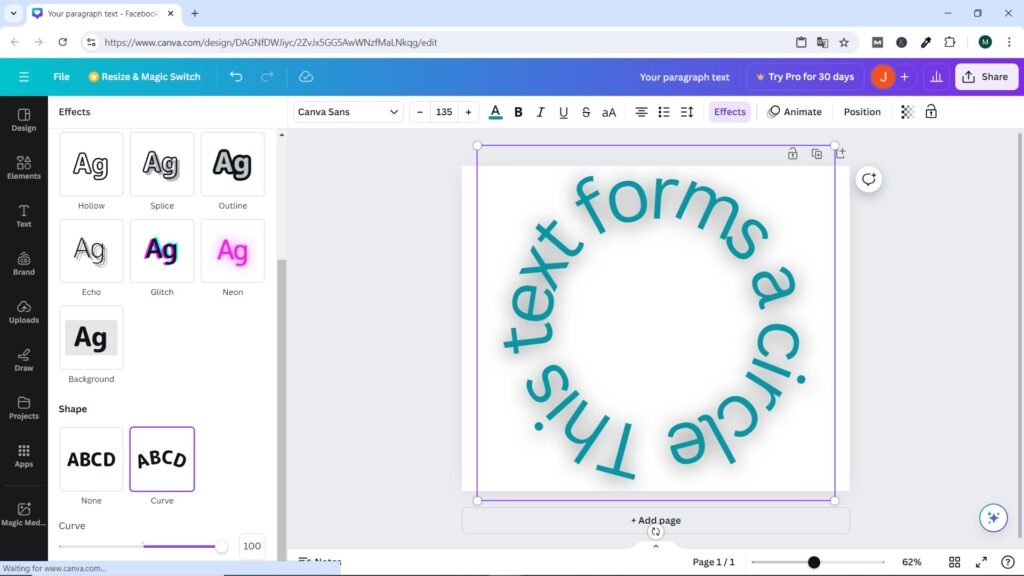
Lastly, we’re going to show you a great feature of Canva that will save you a lot of time: the curved text feature. You can now curve your text with the click of a button. It can be found at the bottom of the Font Effects tab and allows you to curve your text up or down, changing the ratio of the curve using the slider at the bottom.
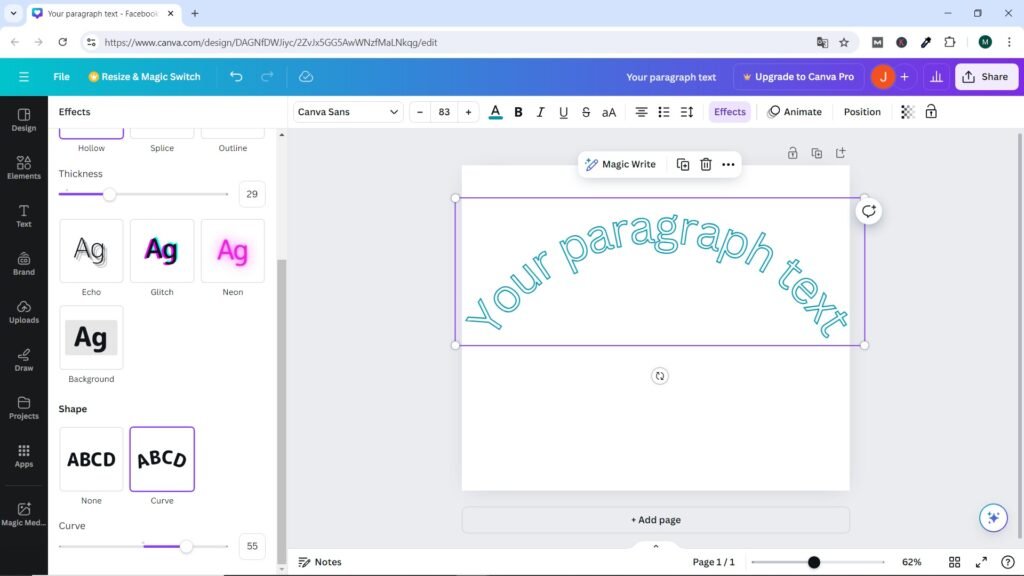
It’s a simple but effective feature, perfect for logos or wrapping text around a website icon or button.
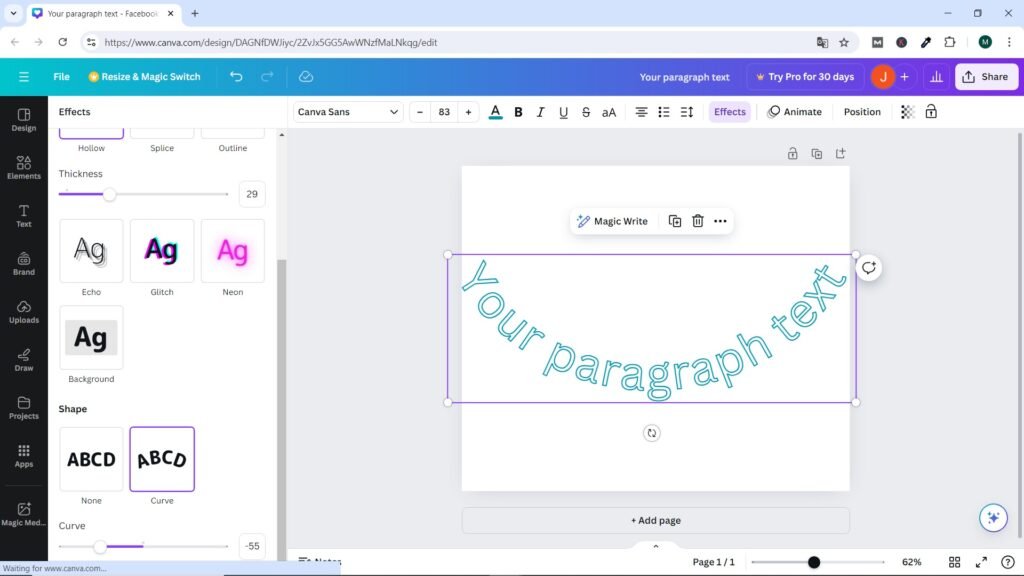
Font effects in Canva are spectacular. They have the power to transform your text into a true visual magnet, capturing the viewer’s attention and making your design stand out in an impactful way.
Canva Tools to Edit Elements and Images to Enhance Your Content
Canva elements and images can help make your designs unique to your business – there are hundreds of thousands available for you to use. They can be edited directly in Canva, and we have a variety of tools to do so. Elements can be edited too, but not to the same extent as images. We can also change the background of a design to make it stand out.
Canva Elements
Elements in Canva are what you use to create a design; they can be shapes, icons, animations, text, images, and videos. Each of these options has its place within your design.
Let’s look at static elements; these are elements that don’t move. However, the following also applies to animated elements and stickers; you can’t change the colors of these.
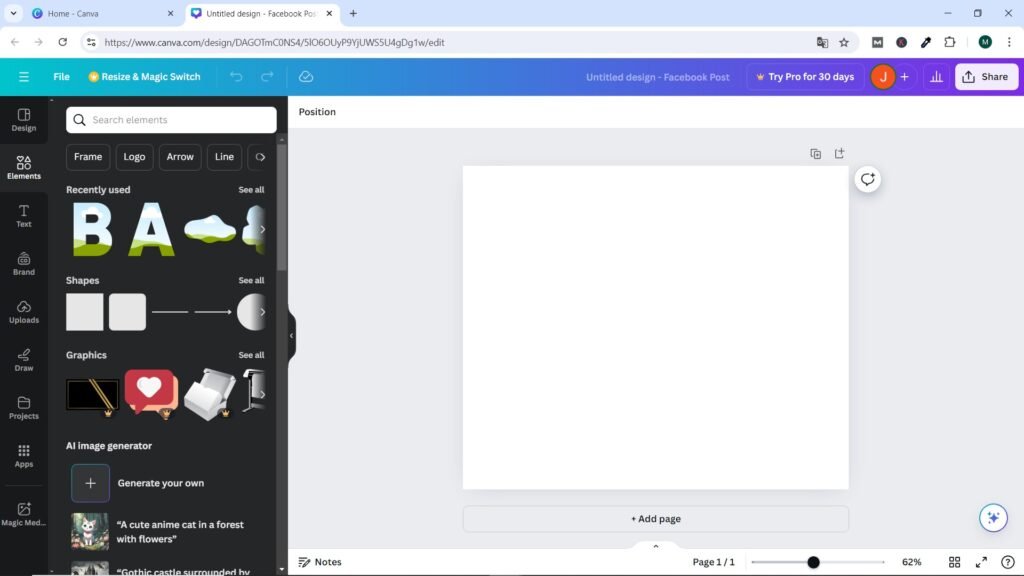
Once you have your template size open, head over to the Elements section in the top left corner, and here you’ll see a search bar and many different sections below: Recently Used, Lines & Shapes, Charts, Photos, Frames, Grids, etc.
Add Images
Canva has amassed a huge library of images – hundreds of thousands. Canva has partnered with other image platforms like Pixabay and Pexels to bring you even more amazing images.
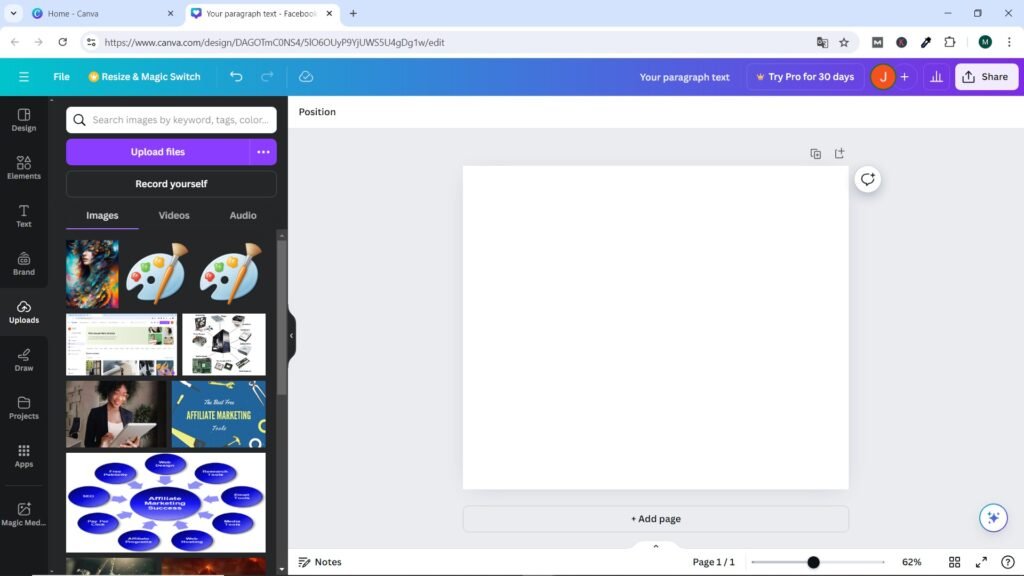
However, if you can’t find an image you like or prefer to use your own images, you can upload them to Canva using the Uploads button. You can find it in the menu on the left of your template – from here you can upload images and videos that you’ve saved on your device.
Using Grids for Fast, Effective and Attractive Layouts
Grids can help you create an attractive-looking graphic in a matter of minutes, giving you space for your images, your company name, your branding, and comprehensive information. Grids are located in the Elements section in Canva, so once you have your blank template open, click on Elements → Grids.
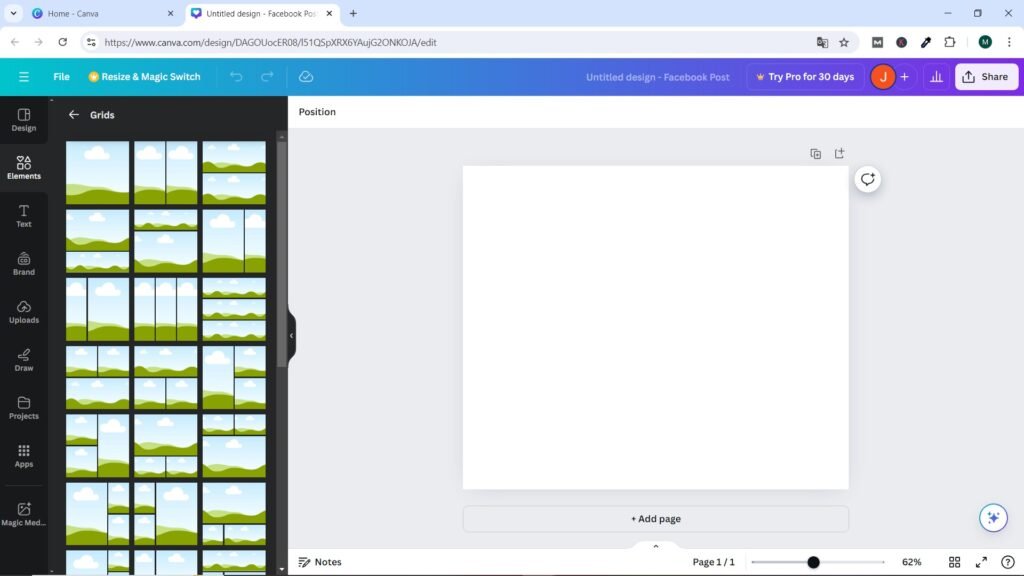
You’ll notice that you now have a long list of straight-edged elements including a green hill, a blue sky, and a white cloud. Any element in Canva that has the white cloud, green hill, and blue sky can have a color, image, or video added to it. As an exercise, scroll down and select one that has the square layout you like.
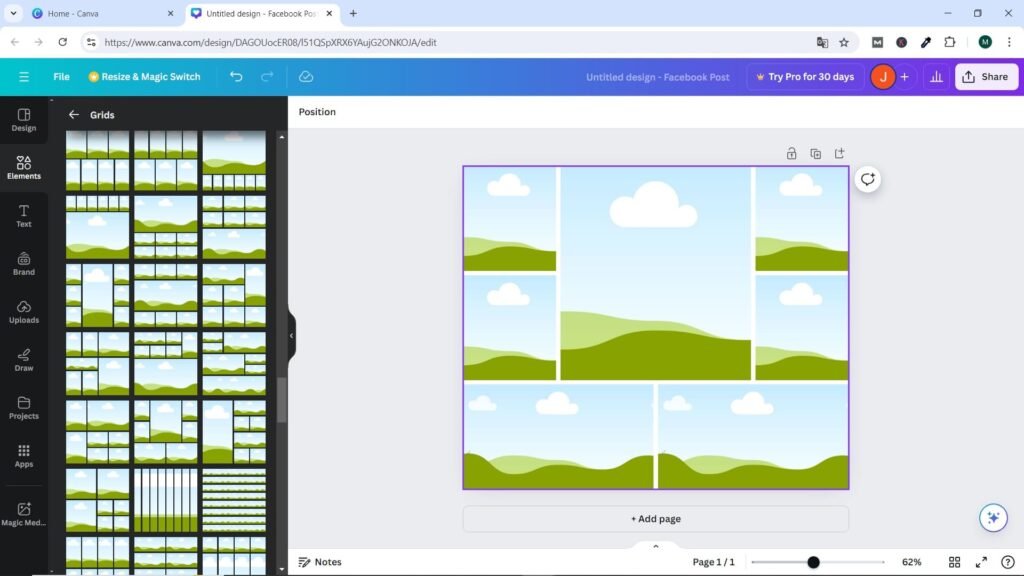
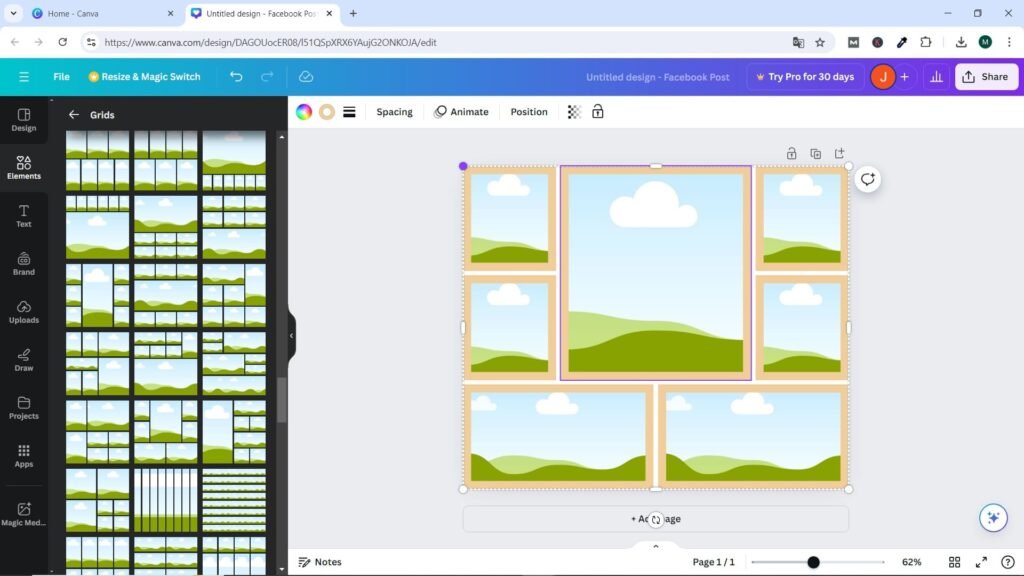
If you want to add borders to the entire grid, first click anywhere inside the grid, then click on any of the four white circles at the corners of the grid.
Start dragging and dropping images. They can be from the Uploads section or from Canva’s image library. We’ve added some computer parts sale images to create a sale ad.
After you’ve filled the grid with images, you may want to add some information, perhaps a company name, logo, or retail location. Select the central image, for example, and press Delete on your keyboard, which will change the background to white. Then, go to the color palette and change the color to a solid color or a gradient. Type in your ad or announcement information.
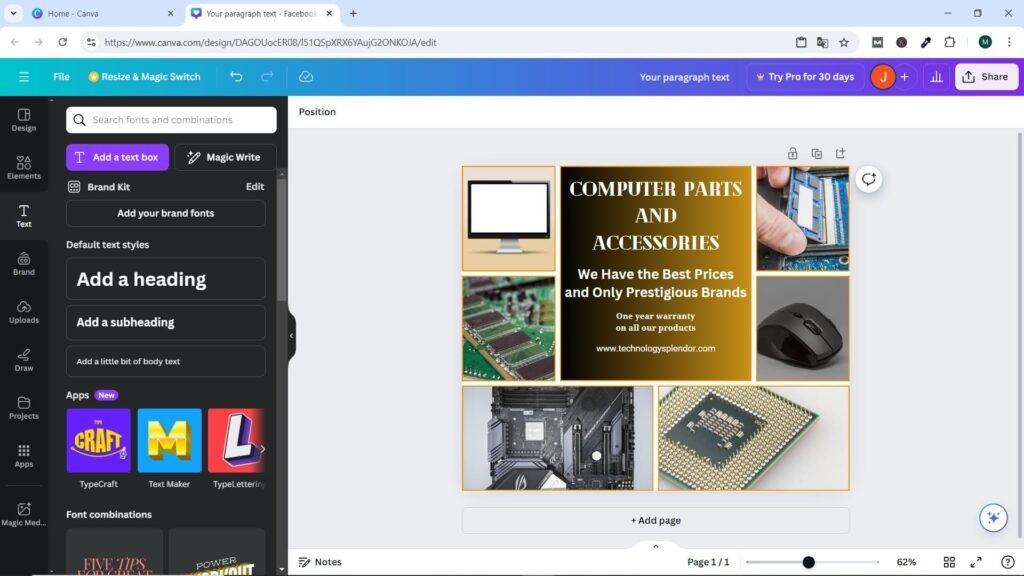
With just a few clicks, you’ll have a cool image that you can now use on your social media profile or any other advertising platform. In this example, we’re showing an image to promote a computer parts and accessories offer, created using a grid and text boxes.
Designing with Frames
Frames are similar to grids in that you can add an image, color, or video to them, but they come in different shapes instead of just squares. We have options like geometric shapes, gadgets, flowers, letters, numbers, and a wide variety of other shapes. They can be great for creating graphics with regular and irregular non-standard shapes. They are found by clicking Elements → Frames → See All.
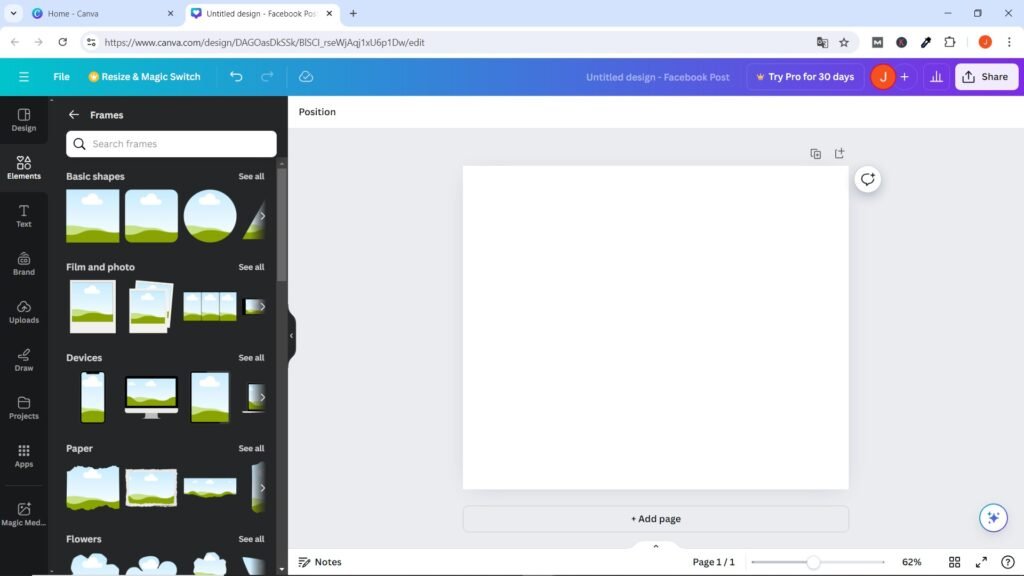
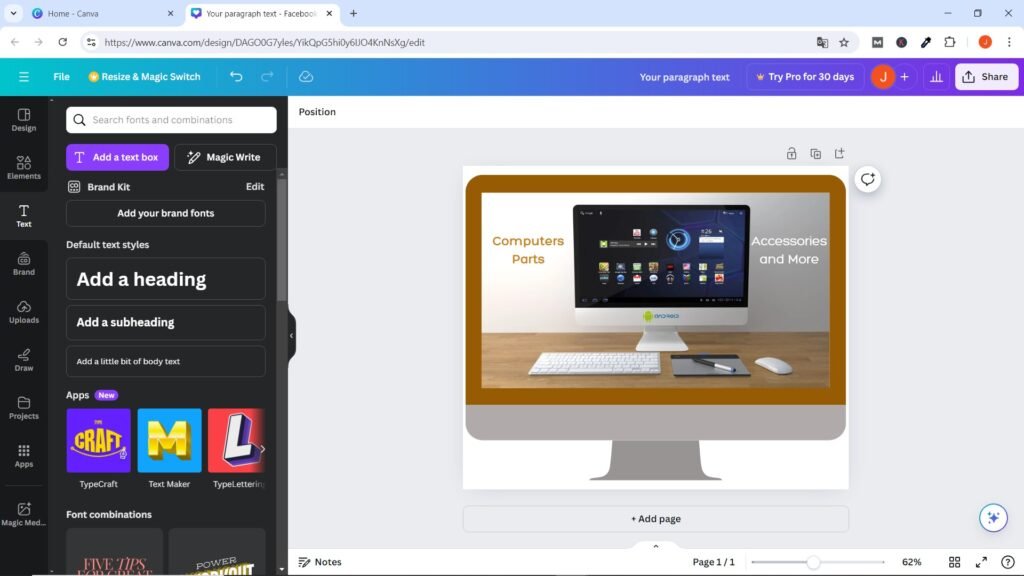
You can create any style you like with Frames. Add for example a frame from a Device (in this case a computer) and insert an image such as a photo taken from Canva. You can find them in the Photos section of Canva. You can add a text box anywhere in the photo.
Frames and grids are great for creating quick graphics, but sometimes we want to add a little more information. This can be done using Charts and/or Tables in Canva.
As we’ve already discussed, Canva is an intuitive design platform that lets you create stunning images with a simple drag-and-drop interface. It offers access to hundreds of thousands of high-quality images, elements, fonts, shapes, and templates. While many of these resources are free, if you subscribe to a paid subscription, you’ll be able to tap into the full potential of the platform and enjoy unlimited design options.
In this post, we’ve explained the basics to help you get started creating your own designs. Now it’s up to you to dig deeper and explore its wide range of features. With practice, you’ll soon master all the tools and features that Canva offers, allowing you to bring your creative vision to life with a professional finish and ease.
Discover More of Technology Splendor: Explore Our Other Sites
Your Health is your Best Investment
Energy, clarity, and balance are the foundation of every dream. Without health, wealth loses its shine and relationships lose their spark. Discover strategies to strengthen your body, sharpen your mind, and energize your spirit.
Learn How to Protect It →Relationships Give Life Meaning
Health gives you energy. Wealth gives you freedom. But only deep, authentic relationships give life true purpose. Discover the tools to connect, love, and communicate at your best.
Improve your Personal and Business Relationships
