Learn about partitions in Windows and how to format and maintain SSD and HDD drives. Understand the different types of partitions, formatting options for SSD and HDD, and tips for maintenance and troubleshooting. Find out how to use the Disk Management tool in Windows and keep your drives in optimal condition.
From your PC’s point of view, a newly installed hard drive is nothing more than a huge pile of unorganized storage space. Sure, CMOS recognizes it as a drive, but your operating system has no idea without more information. Your operating system must organize that storage so that you can use the drive to store data.
Introduction
Once you’ve successfully installed a hard drive, you need to perform two more steps to translate a drive’s raw media into something the system can use: partitioning and formatting. Partitioning is the process of electronically subdividing a physical drive into one or more drives called partitions. After partitioning, you must format the drive. Formatting installs a file system on the drive that organizes each partition in such a way that the operating system can store files and folders on the drive. Windows uses several types of file systems.
We use the term “hard drive” as a generic term that covers all types of drives such as HDD and SSD. Once you enter Windows, the operating system doesn’t particularly care whether the drive is a magnetic hard disk drive (HDD) or a solid state drive (SSD). The tools and steps to prepare the drives for data are the same.
The process of partitioning and formatting a drive is one of the few areas left on the software side of PC assembly that requires you to perform a fairly complex series of manual steps.
HDD Partitions
Before a magnetic disk drive (HDD) leaves the factory, it is magnetically preset with millions of storage areas known as sectors.
Solid state drives come from the factory and each chip stores millions of storage areas known as pages. A group of pages are combined into a block.
If you think of a hard drive as an empty building filled with many rooms (the blocks), the partition is what organizes the rooms into something larger (like suites or companies) and gives each larger entity a name. Partitioning takes a single physical drive and organizes it electronically into one or more partitions. With that analogy, think of partitions as sets of rooms in the building. Partitions provide tremendous flexibility in hard drive organization. With partitions, you can organize a disk according to your personal tastes.
You can partition a hard drive to store more than one operating system: store one operating system in one partition and create additional partitions for another operating system. Of course, most people use only one operating system, but if for some reason you want to have the option of booting into Windows or Linux, partitions are key.
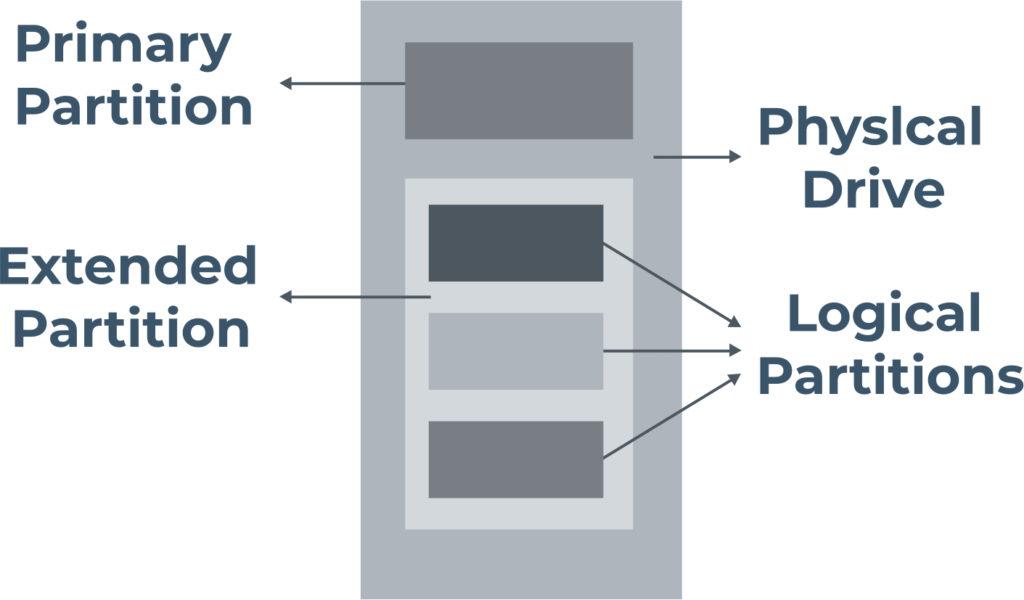
HDD Primary Partitions
Primary partitions are usually assigned drive letters and appear in Windows Explorer/File Explorer (once you format them). The first lettered primary partition in Windows is always C:. After that, you can label partitions D: to Z:.
Partitions do not always have drive letters. Windows creates a small primary partition called “System Reserved” for essential Windows boot files. On a related topic, the first primary Windows partition is called “C:” because early PCs had one or two floppy drives installed and were labeled “A:” and “B:.”
HDD Extended Partitions
Extended partitions were invented to get around this limit. An extended partition may contain multiple logical drives, each of which can get a drive letter. Extended partitions do not receive drive letters, but the logical drives within an extended partition do.
When is partitioning required?
The two most common situations that are likely to require partitioning are when you install an operating system on a new system and when you add an additional drive to an existing system. When you install a new operating system, the setup program asks you how you want to partition the drive. When you add a new hard drive to an existing system, each operating system has a built-in tool to help you partition it.
Each version of Windows offers a different tool for partitioning hard drives. For more than 20 years, since the days of DOS and early Windows (up to Windows Me), we used a command-line program called FDISK to partition drives.
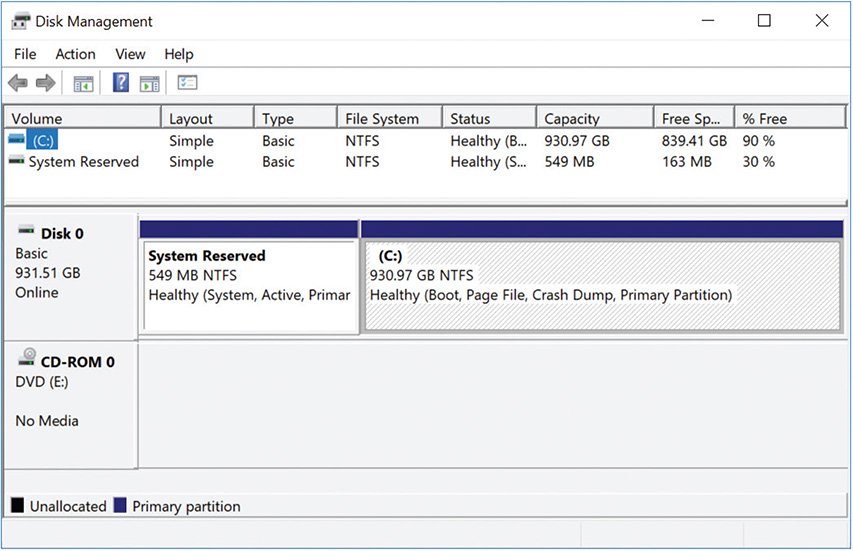
Modern versions of Windows use a graphical partition program called Disk Management. You’ll find it in the Quick Links or Computer Management menu under Administrative Tools.
In the early days of PCs, you couldn’t change the size or type of a partition (other than deleting it) once it had been created with any Microsoft tool. Some third-party tools gave technicians the tools to resize partitions without losing the data they contained. Current Microsoft Windows tools allow you to change the size of free space. Windows allows you to non-destructively resize partitions by shrinking or expanding existing partitions with free space available.
HDD Formatting
Once you have partitioned a hard drive, that partition is nothing more than a large number of blocks. Your operating system needs to store files, named files. We need to organize those blocks.
Formatting, the process of converting a partition into something that stores files, does two things. First, it creates a file system: an organization of all the blocks contained in that partition, allowing file storage and retrieval. Second, formatting creates a root directory in the file system to allow the partition to store folders. You must format each partition/volume so that they can contain and recover data.
Each operating system has its own file systems. Windows has file systems with names like NTFS, FAT32, and exFAT.
File Systems in Windows
Each version of Windows comes with a built-in formatting utility with which to create one or more file systems on a partition or volume. The versions of Windows currently in use support three Microsoft file systems: FAT32, NTFS, and exFAT (for removable media).
All Windows file systems organize blocks of data into groups called clusters. The size of each cluster varies depending on the file system and partition size. Windows uses clusters to overcome some of the addressing limitations inherent to each file system.
Boot media
When building a new PC the hard drive has no operating system, so you need to boot something to configure that hard drive. Any software that can boot a system is, by definition, an operating system. You need an optical disk or USB flash drive with a bootable operating system installed.
Any removable media that has a bootable operating system is generically called a boot device or boot disk. Your system boots from the bootable media, which then loads some type of operating system that allows you to partition, format, and install an operating system on your new hard drive. Boot media comes from many sources. All Windows operating system installation media are bootable media.
Each bootable device has partition tools and a way to format a new partition. A hard drive must have a partition and must be formatted to support the installation of the operating system.
Partition and Format with Installation Media
When you boot the Windows installation media and the setup program detects a hard drive that is not yet partitioned, it prompts you with a sequence of steps to partition and format the hard drive.
The process of partitioning and formatting when installing Windows is simple. You’ll go through a couple of installation screens where you’ll select things like language and be prompted for a product key and acceptance of the license agreement.

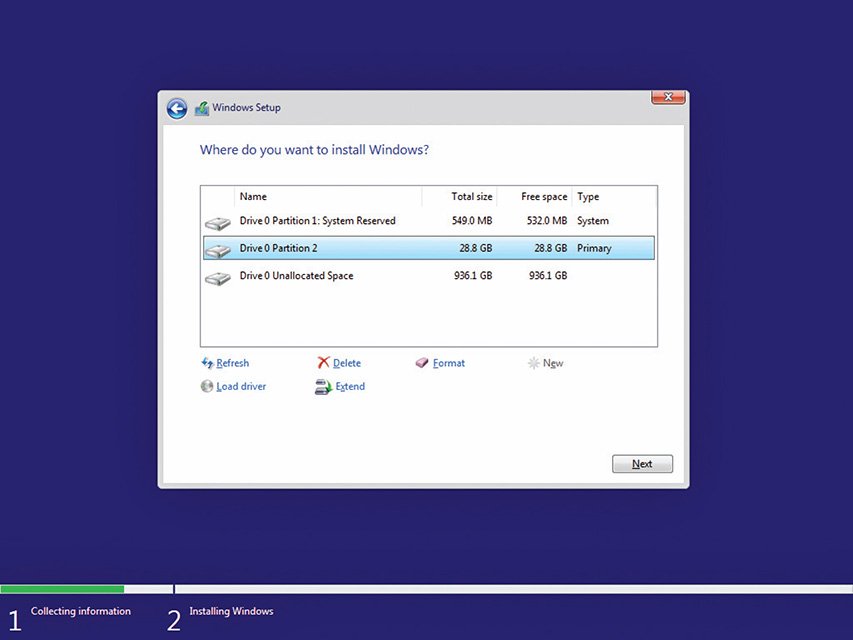
Finally you will reach Where do you want to install Windows? dialog box.

Click Next to do the most common partitioning and formatting action: creating a single C: partition, making it active, and formatting it as NTFS. Note that Windows creates two partitions: an EFI or System Reserved partition and the C: partition. This is normal, the way the system was designed to work.
If you want to do any custom partitioning or delete existing partitions, select one of the options. To create a new partition, click the New button. Type in an amount in megabytes that you want to use for a new partition, then click Apply. You will get a notice that Windows might create additional partitions for system files. When you click OK, Windows will create the 100-MB EFI. Any leftover drive space will be listed as Unallocated Space.
Once you create a new partition, click the Format button. The installer won’t ask you what file system to use. Newer Windows versions can read FAT32 drives, but they won’t install to such a partition by default.
HDD, SSD Maintenance and Troubleshooting
Hard drives are complex mechanical and electrical devices. With platters spinning at thousands of rotations per minute, they also generate heat and vibration. All of these factors make hard drives susceptible to failure.
Maintaining and troubleshooting hard disk drives (HDDs) and solid-state drives (SSDs) is crucial for ensuring their longevity and optimal performance. Here’s a comprehensive guide on maintenance and troubleshooting for both types of drives:
Maintenance:
Regular backups: Always maintain regular backups of important data to prevent loss in case of drive failure.
Firmware updates: Keep the firmware of your drive up to date to ensure compatibility and performance improvements. Check the manufacturer’s website for updates.
Disk Cleanup (for HDDs): Regularly perform disk cleanup to remove unnecessary files and free up space on your HDD. You can use built-in tools like Disk Cleanup on Windows or third-party software.
Defragmentation (for HDDs): Defragmentation helps optimize the arrangement of files on an HDD to improve read and write speeds. However, SSDs don’t require defragmentation due to their different architecture.
Check for physical damage: Periodically inspect your drive for any physical damage such as dents or scratches. Physical damage can lead to drive failure.
Temperature monitoring: Keep an eye on the temperature of your drives, especially for HDDs which are more sensitive to temperature fluctuations. Ensure proper ventilation and cooling.
Avoid overfilling: Avoid filling up your drive to its maximum capacity as it can lead to performance degradation. Leave some free space for better performance.
Troubleshooting:
Check connections: Ensure that all cables connecting the drive to your system are properly seated. Loose connections can cause the drive to be unrecognized or malfunction.
Drive detection: If your drive is not being detected by the system, try connecting it to another computer to determine if the issue is with the drive or the computer.
Run diagnostics: Most drive manufacturers provide diagnostic tools that can help identify issues with the drive. Run these tools to check for errors and bad sectors.
Check for errors: Use built-in tools like CHKDSK on Windows or Disk Utility on macOS to scan and fix errors on the drive.
SSD health monitoring: SSDs come with a limited number of write cycles. Monitor the health of your SSD using tools like SMART (Self-Monitoring, Analysis, and Reporting Technology) to predict potential failures.
Update drivers and firmware: Ensure that you have the latest drivers installed for your drive and update the firmware if available. Sometimes, compatibility issues can be resolved with driver updates.
Data recovery: In case of data loss, use data recovery software or consult a professional data recovery service to retrieve lost data from the drive.
Contact support: If you’re unable to troubleshoot the issue on your own, contact the manufacturer’s support for assistance or consider seeking help from a professional technician.
By following these maintenance and troubleshooting tips, you can ensure the optimal performance and longevity of your HDDs and SSDs.