We will understand the crucial role of Firmware, BIOS, CMOS and ROM, distinguish between various system setup utility options, discuss troubleshooting using Power On Self Test (POST), and provide tips on how to maintain BIOS settings.
Firmware
Let’s begin by understanding the concept of firmware. Firmware refers to the software that is embedded in a hardware device. It acts as a bridge between the hardware and the operating system, allowing them to communicate and work together effectively. Firmware is responsible for controlling the basic functions of the hardware (devices such as keyboards and mice to provide input, and output devices such as monitors and speakers to communicate the current state of the running programs to you.
A computer also needs permanent storage devices, such as solid-state drives, to store programs and data when you turn off the computer) and ensuring its proper functioning. It is usually stored in a non-volatile memory, such as ROM or flash memory, which allows it to retain its data even when the power is turned off.
Firmware plays a crucial role in the overall performance and functionality of hardware devices. It acts as the bridge between the hardware and the software, enabling seamless communication and coordination between the two. Without firmware, hardware devices would be inert and unable to perform their intended tasks.
One of the key advantages of firmware being stored in read-only memory (ROM) is its stability and permanence. Unlike regular software, which can be easily modified or updated, firmware remains unchanged unless specifically updated by the manufacturer. This ensures that the device operates consistently and reliably, without the risk of accidental modifications or corruption.
While firmware updates are generally beneficial, they can also introduce risks if not performed correctly. For example, an incomplete or faulty firmware update can result in a device malfunctioning or becoming inoperable. Therefore, it is important for users to follow the manufacturer’s instructions carefully and ensure that the device is connected to a stable power source during the update process.
CMOS
CMOS (Complementary Metal-Oxide-Semiconductor) is a type of memory (ROM) that is used to store the BIOS settings. It is a battery-powered, non-volatile memory that retains its data even when the power is turned off. The CMOS memory contains information about the hardware configuration of the computer, such as the date and time, the boot order, and various other settings. The BIOS uses this information to initialize the hardware components and ensure that the computer boots up correctly. In case the CMOS battery dies or is removed, the BIOS settings may be lost, and the computer may not function properly until the settings are reconfigured.
Another important setting that can be configured in the CMOS setup utility is the power management options. This allows users to define how the computer should behave when it is idle or when certain events occur. For example, users can set the computer to enter a low-power sleep mode after a certain period of inactivity, or to automatically shut down after a power loss.
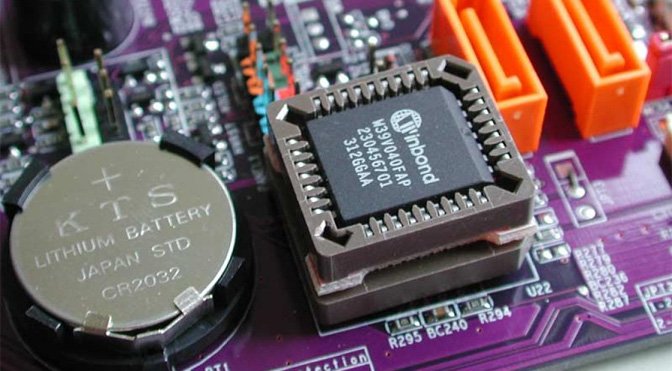
The CMOS memory itself is a small amount of volatile memory that stores the BIOS settings. It is powered by a CMOS battery, which is a small button cell battery typically located on the motherboard. This battery ensures that the settings are retained even when the computer is turned off or unplugged from the power source. Over time, the CMOS battery may lose its charge and need to be replaced, otherwise the BIOS settings may be lost.
Overall, the CMOS technology has been widely used in computers for many years due to its low power consumption, high integration density, and compatibility with a wide range of electronic devices.
BIOS (Basic Input/Output System)
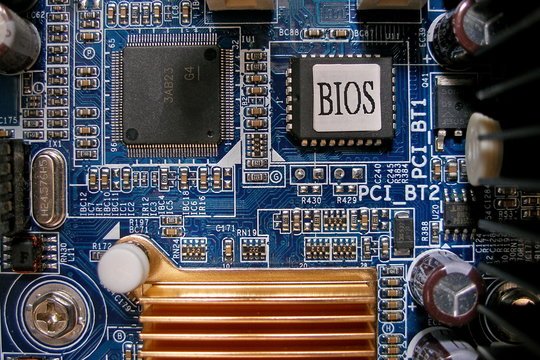
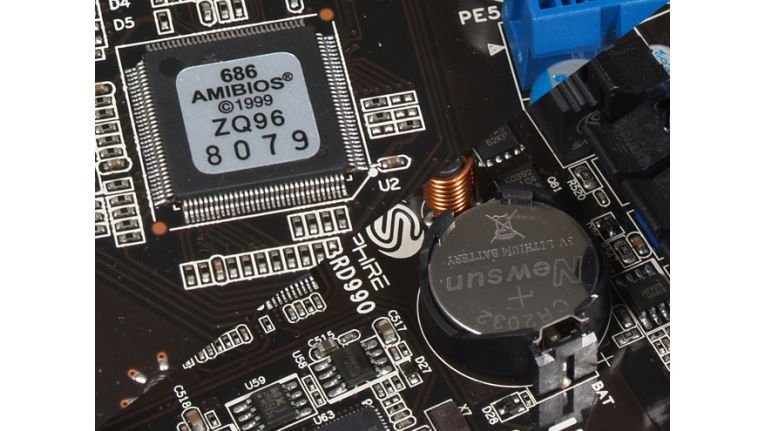
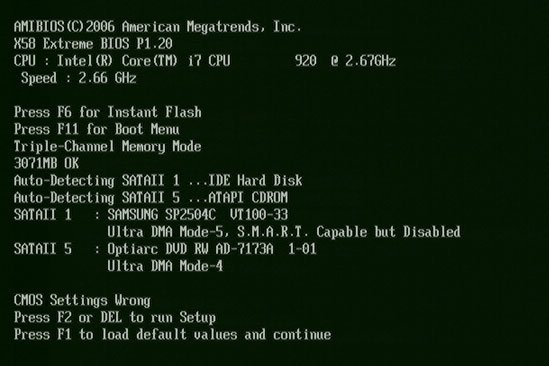
Next, we have the BIOS (Basic Input/Output System), which is a type of firmware that is specifically designed to initialize and configure the hardware components of a computer during the boot process. The BIOS is responsible for performing a series of checks and tests, known as the Power-On Self-Test (POST), to ensure that all the hardware components are functioning correctly. It also provides a set of low-level software routines that the operating system can use to interact with the hardware. The BIOS is typically stored in a ROM chip on the motherboard, which makes it non-volatile and ensures that it remains intact even if the power is turned off.
The BIOS is a firmware that is responsible for initializing and configuring the hardware components of a computer during the boot process. It is the first software that runs when you turn on your computer and acts as a bridge between the hardware and the operating system. The BIOS provides low-level control over the computer’s hardware and allows the operating system to communicate with it.
The main functions of the BIOS include:
Date and time settings
This option allows users to set the current date and time. It is important to keep the date and time accurate as it is used by various system functions, such as file timestamps and scheduling tasks.
Default/Optimized Settings
Every system setup utility has a couple of reset options, commonly called Load Default Settings and OS Optimized Defaults. These options keep you from having to memorize all of those weird settings you’ll never touch. Default or Fail-Safe sets everything to very simple settings—you might occasionally use this setting when very low-level problems such as freeze-ups occur and you’ve checked more obvious areas first. Optimized sets the system to the best possible speed/stability for the system. You would use this option after you’ve tampered with the system setup too much and need to put it back like it was.
These system setup utility options provide users with a comprehensive set of tools to customize and optimize their computer’s settings. It is important to note that accessing and modifying these options requires caution and knowledge, as incorrect settings can lead to system instability or malfunction. It is always recommended to consult the computer’s documentation or seek professional assistance when making changes to the system setup utility options.
Power-on Self-Test (POST)
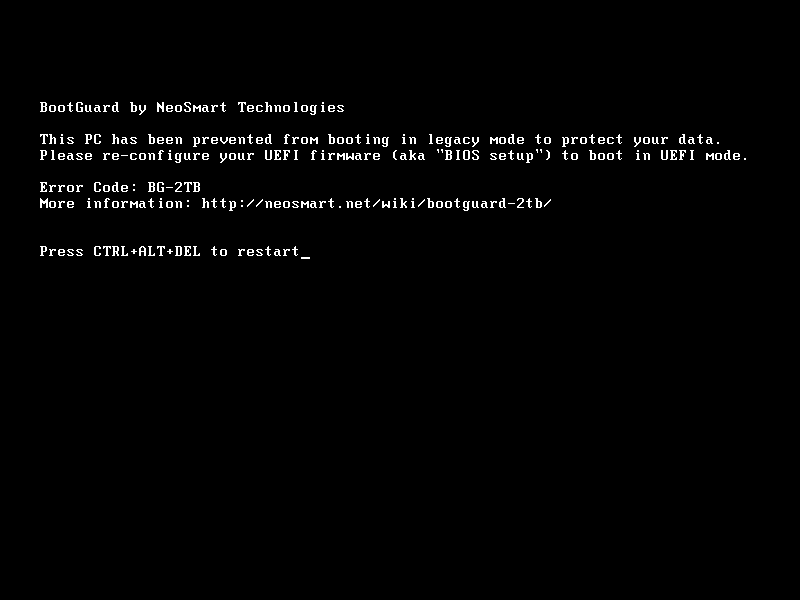
The BIOS performs a series of tests to check if the hardware components are functioning properly. If any issues are detected, the BIOS will display error messages or beep codes to indicate the problem.
CMOS Setup Utility
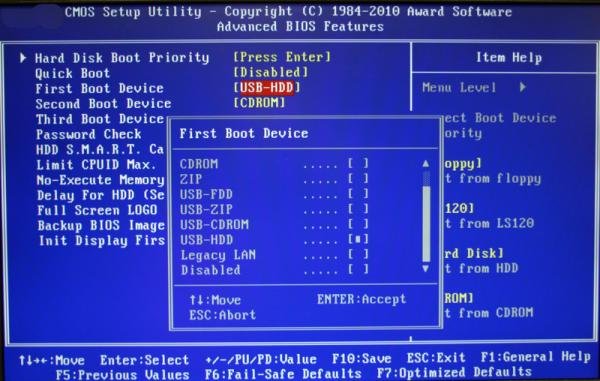
The BIOS provides access to the CMOS setup utility, which allows users to configure various system settings such as date and time, boot sequence, and hardware parameters.
Another important function of the BIOS is to handle system interrupts. When a hardware device needs to communicate with the CPU, it sends an interrupt signal to the BIOS. The BIOS then determines the appropriate interrupt handler and executes it, allowing the CPU to respond to the device’s request. This interrupt handling mechanism is crucial for the proper functioning of hardware devices and ensures that they can interact with the operating system efficiently.
Without the BIOS, the computer would not be able to start up and the operating system would not be able to communicate with the hardware effectively. Therefore, understanding the functions and capabilities of the BIOS is essential for troubleshooting hardware issues and optimizing system performance.
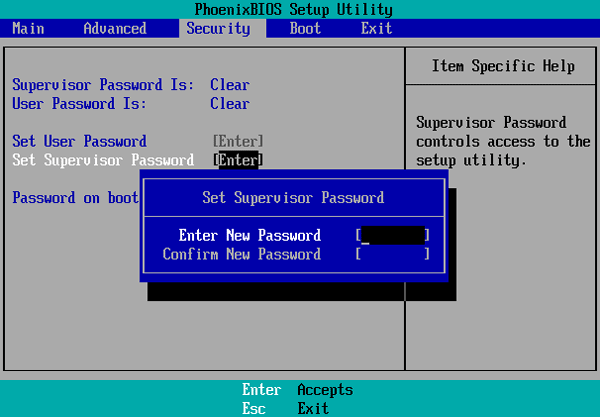
You access the system setup utility by pressing one or more utility – specific keys when the system is booting. Turn off your system and then turn it on again. Watch the screen closely ! On some systems you’ll read text on the screen telling you what key(s) to press. There’s no standard key to press here, but the two most common ways are the keys Del and F2.
And immediately the Setup Utilities screen will appear.

Every system setup utility has its own look and feel. Don’t let these differences bother you, and remember they all do roughly the same thing, so poke around and explore! As long as you don’t save your changes you won’t hurt anything.
Boot Sequence
The BIOS determines the order in which the computer searches for an operating system to load. It looks for the operating system in various storage devices such as hard drives, CD/DVD drives, and USB drives.
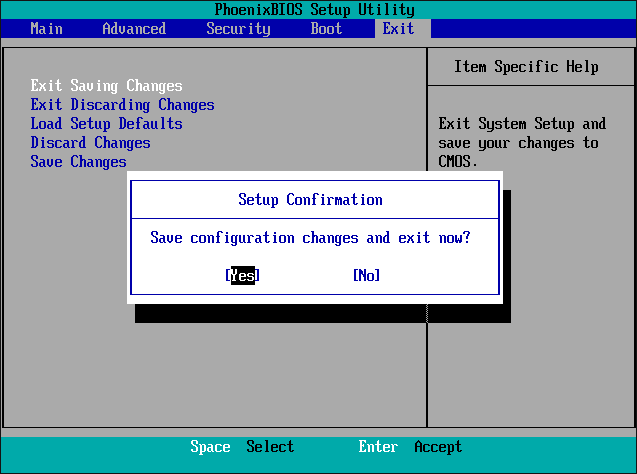
Of course, all system setup utilities provide some method to Save Changes, Discard Changes, Exit Saving Changes, or Exit Discarding Changes. Use these options as needed for your situation. Exit Discarding Changes is particularly nice for those folks who want to poke around the CMOS setup utility but don’t want to mess anything up. Use it !
ROM (Read-Only Memory)
We have ROM (Read-Only Memory), which refers to a type of non-volatile memory that can only be read from and not written to. ROM is used to store permanent data and instructions that are essential for the functioning of the computer. In the context of firmware and BIOS, ROM is used to store the firmware and BIOS code, which is necessary for the computer to boot up and perform its basic functions. Since ROM, unlike RAM, is non-volatile, it retains its data even when the power is turned off, ensuring that the computer can start up properly every time it is powered on.
There are different types of ROM, each with its own unique characteristics and applications:
Mask ROM
This type of ROM is programmed during the manufacturing process and cannot be modified. It is commonly used for storing firmware and other critical software that must remain unchanged throughout the device’s lifespan. Mask ROM is cost-effective for large-scale production as it allows for mass programming of identical chips.
PROM (Programmable Read-Only Memory)
PROM, as the name suggests, can be programmed by the user using a special device called a PROM programmer. This type of ROM offers flexibility as it allows for the modification of its contents after the manufacturing process. However, once programmed, PROM cannot be erased or reprogrammed, making it a one-time programmable memory.
EPROM (Erasable Programmable Read-Only Memory)
EPROM is a type of ROM that can be erased and reprogrammed using ultraviolet (UV) light. It contains a quartz window that allows the UV light to penetrate and erase the stored data. To reprogram EPROM, a device called an EPROM programmer is used to apply the desired data pattern. The erasing and reprogramming process of EPROM is time-consuming and requires the chip to be removed from the circuit, making it less convenient than other types of ROM.
EEPROM (Electrically Erasable Programmable Read-Only Memory)
EEPROM, also known as E2PROM, is a type of ROM that can be erased and reprogrammed electrically. Unlike EPROM, EEPROM does not require the use of UV light for erasing. Instead, it utilizes an electric charge to erase and write data. EEPROM offers the advantage of being able to be reprogrammed while still in the circuit, making it more convenient for updating firmware or making changes to stored data. However, EEPROM has a limited number of erase/write cycles, typically around 100,000, before it may start to degrade.
Each type of ROM has its own advantages and applications, allowing for the storage of permanent data and instructions in various electronic devices, from computers and gaming consoles to smartphones and embedded systems.
Power-On Self-Test (POST)
BIOS isn’t the only program on system ROM. When the computer is turned on or reset, it initiates a special program called the power-on self-test (POST). The POST program checks out the system every time the computer boots. To perform this check, the POST sends out a command that says to all of the devices, “Check yourselves out!” All of the standard devices in the computer then run their own built-in diagnostic, the POST doesn’t specify what they must check. The quality of the diagnostic is up to the people who made that particular device.
Let’s consider the POST for a moment. Suppose some device – let’s say it’s the keyboard controller chip – runs its diagnostic and determines that it is not working properly. What can the POST do about it? Only one thing really: tell the human in front of the PC! So how does the computer tell the human? PCs convey POST information to you in two ways: beep codes and text messages.
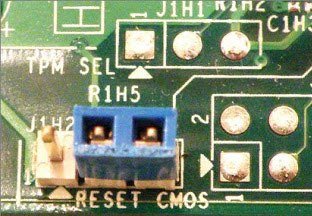
Clearing CMOS
When you mess up a setting (by overclocking too much or disabling something that should have remained enabled – or vice versa) that renders the computer dead, you can reset the CMOS back to factory defaults and start over. Almost every motherboard has a dedicated set of wires called CLRTC or something similar.
Turn off and unplug the computer, then open the case to access the motherboard. Find the CMOS RTC clear wires. Move the shunt (the little plastic and metal jumper thing) from wires 1 and 2 to wires 2 and 3. Wait for 10 seconds and then move the shunt back to the default position. Plug in and boot the system.
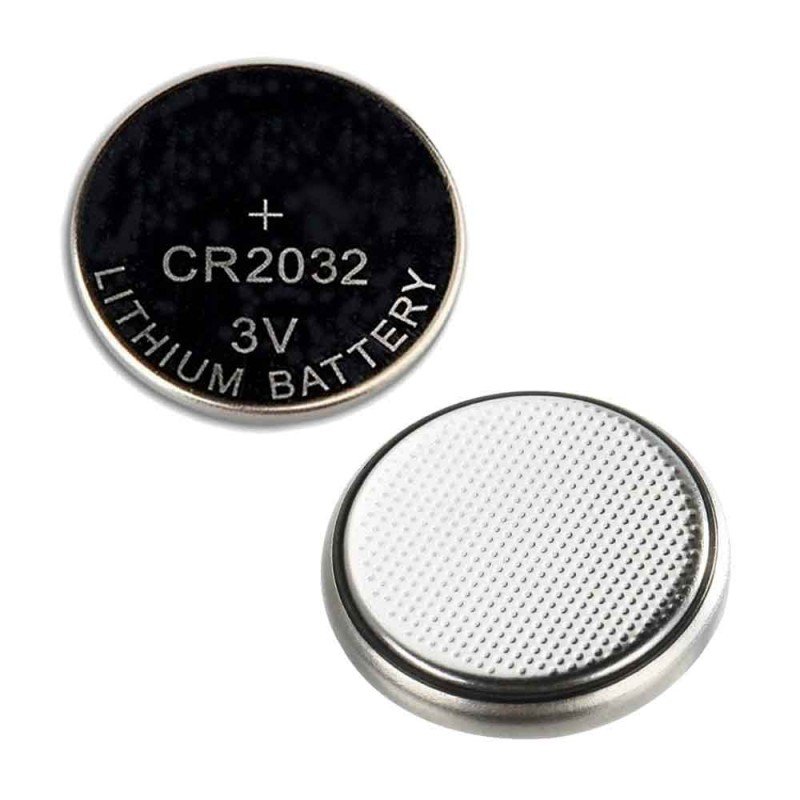
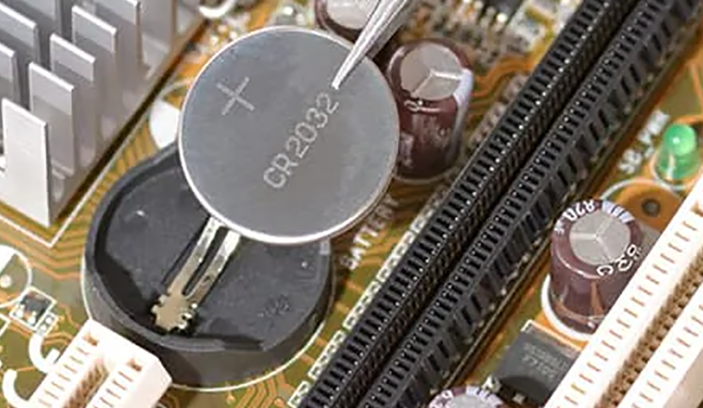
Your CMOS needs a continuous trickle charge to keep the internal clock running and remember its settings. Motherboards use some type of battery, usually a 3-volt Lithium-Ion coin battery, to give the CMOS the charge it needs when the computer is turned off. This is called the CMOS battery. Typical systems use a CR2032 battery.
Maintaining BIOS settings
Proper maintenance of BIOS settings is essential for the optimal performance and stability of your computer. Here are some tips to help you maintain your BIOS settings:
Document your changes: Whenever you make changes to the BIOS settings, it is a good practice to document the changes you made and the reasons behind them. This can help you troubleshoot any issues that may arise in the future or revert to the previous settings if needed.
Be cautious when overclocking: Overclocking can provide a performance boost but can also increase the risk of instability or hardware damage. If you choose to overclock your system, do it gradually and monitor the temperatures and stability of your system.
Keep CMOS battery in good condition: The CMOS battery powers the CMOS memory that stores the BIOS settings. If the CMOS battery is weak or dead, it may cause the BIOS settings to reset to their default values. The most practical way to know when the CMOS battery needs replacing is when you detect that your computer has lost the correct time and/or date.
Secure your BIOS with a password: To prevent unauthorized access to your BIOS settings, consider setting up a password. This can help protect your computer from potential tampering or unauthorized changes. Make sure to choose a strong password and keep it confidential.